Create email template
An email template is a reusable preconfigured entity that simplifies mailing management in the system. By preparing email templates you save time on specifying mailing details every time you need to configure a system notification for some event.
In CTMS, you can create as many email templates for various purposes as needed to support different scenarios, such as confirmation emails for monitoring visits, trip reminder emails, follow-up letters, and so on.
-
In the CTMS application header, select the LIBRARY tab.
-
From the left pane of the page that opens, select Email Template.
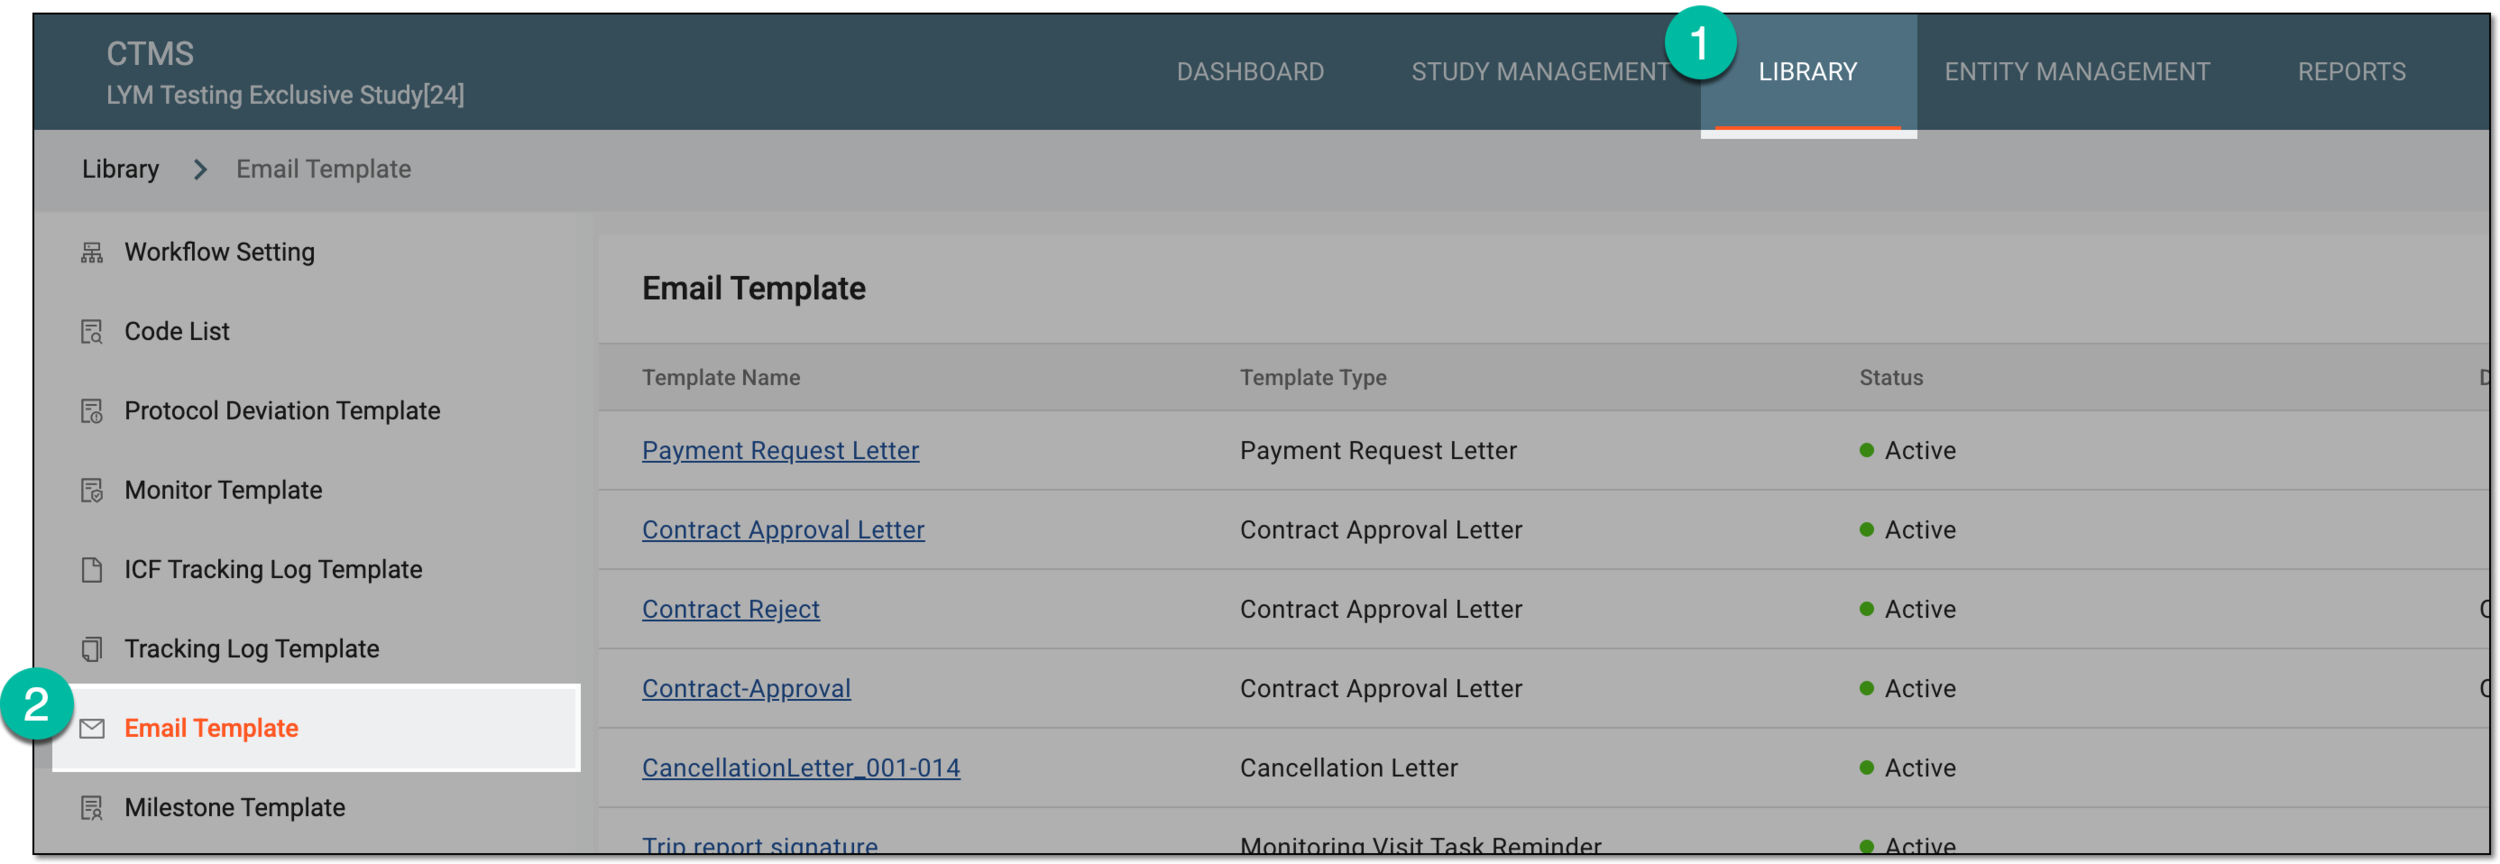 Figure 1. Accessing email templates
-
From the workspace toolbar of the Email Template table that appears, select New Item
 .
.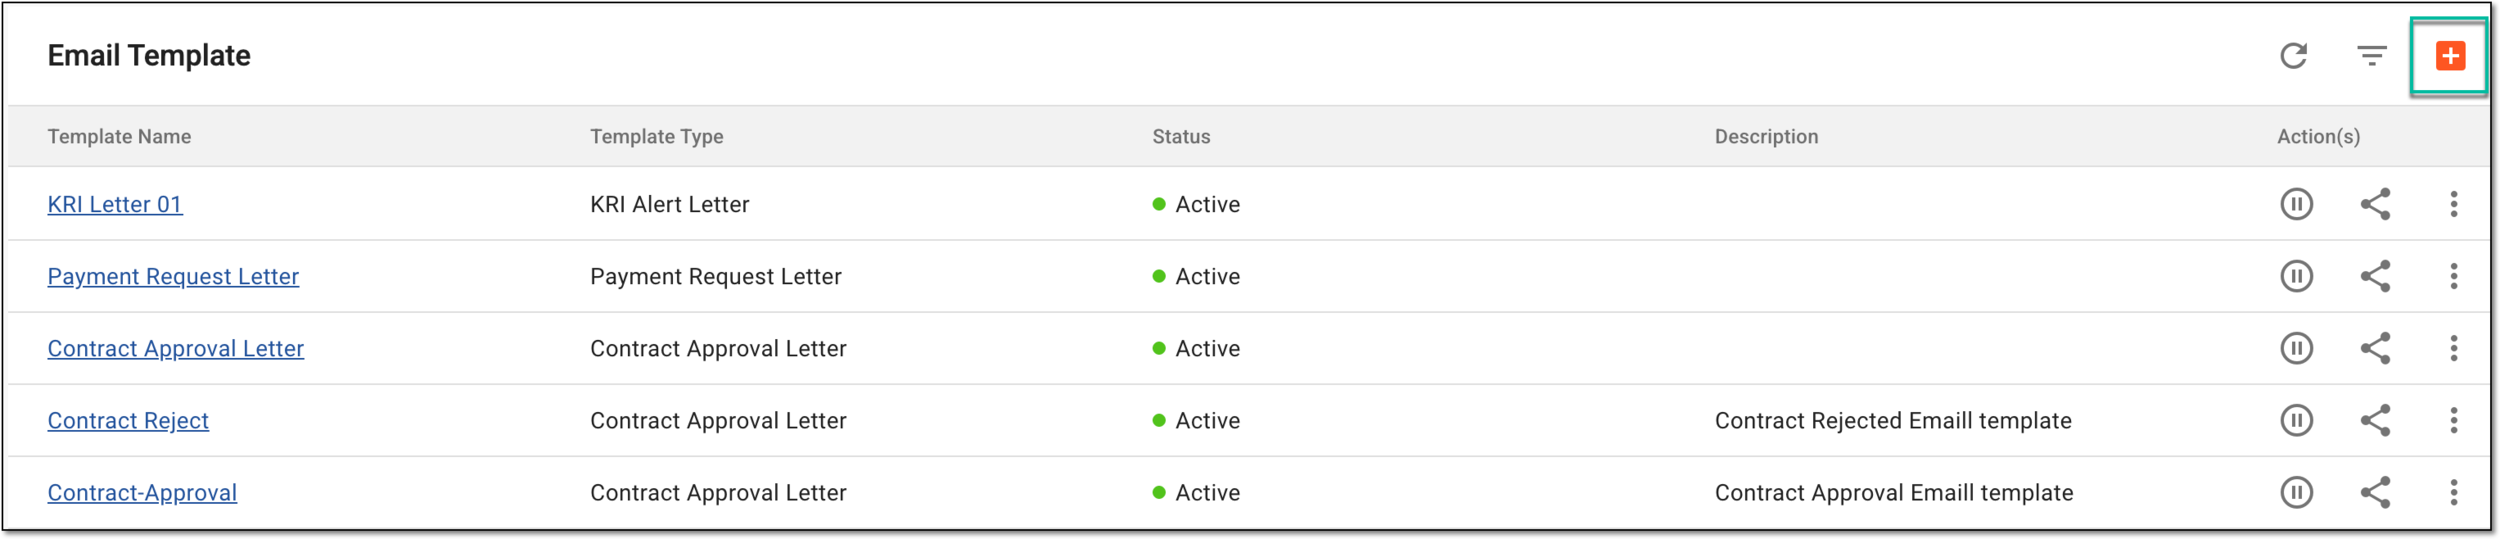 Figure 2. Selecting option to add new email template
-
On the page that opens, add the details as explained in the following table.
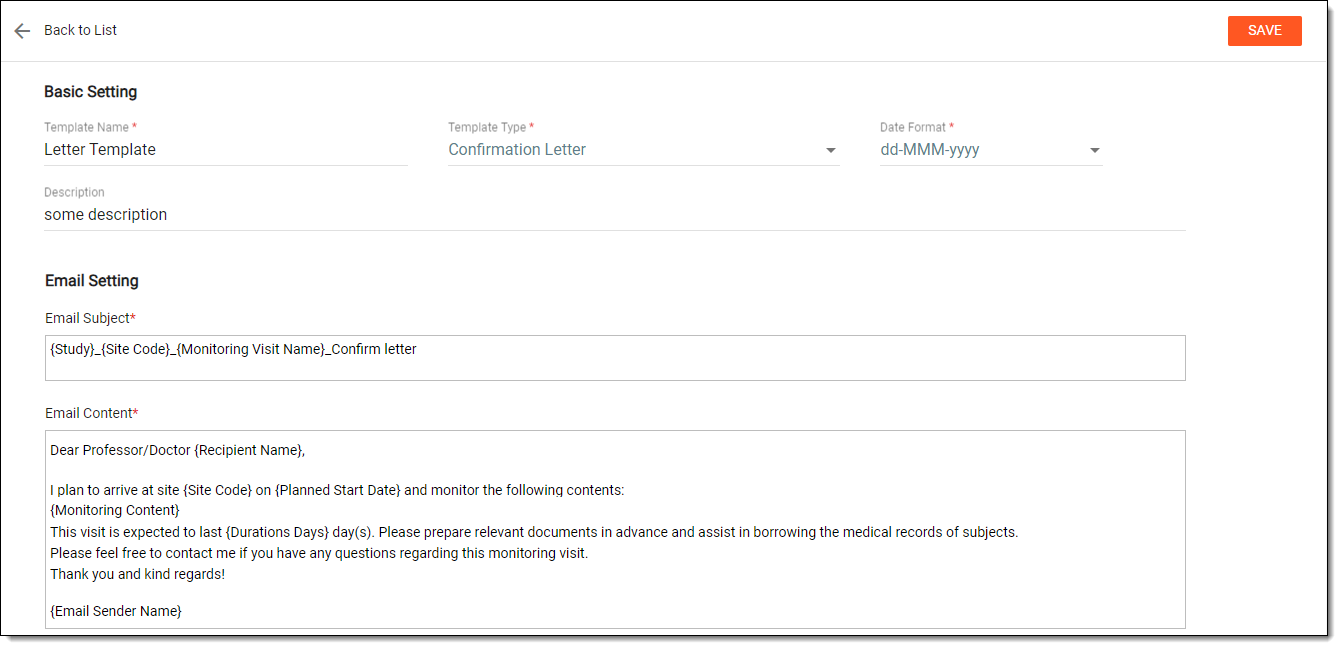 Figure 3. Creating email template
Tip
In the following table, mandatory elements are marked with an asterisk (*).
Element
Details
Basic Setting
Template Name*
Enter a unique descriptive name for your email template.
Template Type*
Select one of the following template types:
-
Travel Reminder: used for the creation of alerts to remind recipients of incomplete site visits.
-
Trip Report Reminder: used for the creation of task reminders to notify recipients about the necessity to complete a trip report.
-
Confirmation Letter: used for designing a confirmation letter configuration of monitoring visits.
-
Follow-up Letter: used for designing a follow-up letter configuration of monitoring visits.
-
Monitoring Visit Task Reminder: used for the creation of task reminders to complete monitoring visit approval or trip report audit.
-
Action Item(s) Reminder: used for the creation of task reminders to notify recipients about the execution of action items.
-
Query Reminder: used for the creation of query reminders associated with queries in a specific trip report, protocol deviation record, or ICF tracking log record.
-
Cancellation Letter: used to notify users of the planned meeting cancellation.
-
Site Close-out Notification Letter: used to notify the site personnel when the site phase changes to Site Closed.
-
Site Activation Letter: used to notify the site personnel on the first activation of the site in the study.
-
Site Selection Letter: used to notify the site personnel when the site phase changes to Site Selection.
-
Potential PD Reminder: used when configuring workflows for the potential protocol deviation (PD) audit.
-
Contract Approval Letter: used when configuring workflows for the contract audit.
-
Payment Request Letter: used when configuring workflows for the payment request audit.
-
Communication Approval Letter: used when configuring workflows for communication activities audit.
-
KRI Alert Letter: used when sending key risk indicator (KRI) alert according to the autoexecution task.
Date Format*
Select one of the available date formats to be displayed in the email content.
For example, if the {Planned Start Date} is mentioned in the email content, this date will be displayed in the selected format when the recipient gets an email.
Description
Enter a brief description explaining the purpose of creating the email template. This distinguishes your template and helps choose a template suitable for the purpose.
Email Setting
Email Subject*
Enter the subject of the email that is to be used as a template for sending task and query reminders. You can also start typing with the opening brace "{" to expand the list of predefined placeholders that you want to include in the email subject to then be replaced with actual data in the resulting email.
For instance, if you want your email subject to include monitoring visit name and type, simply enter { and from the expanded list, select the needed placeholders.
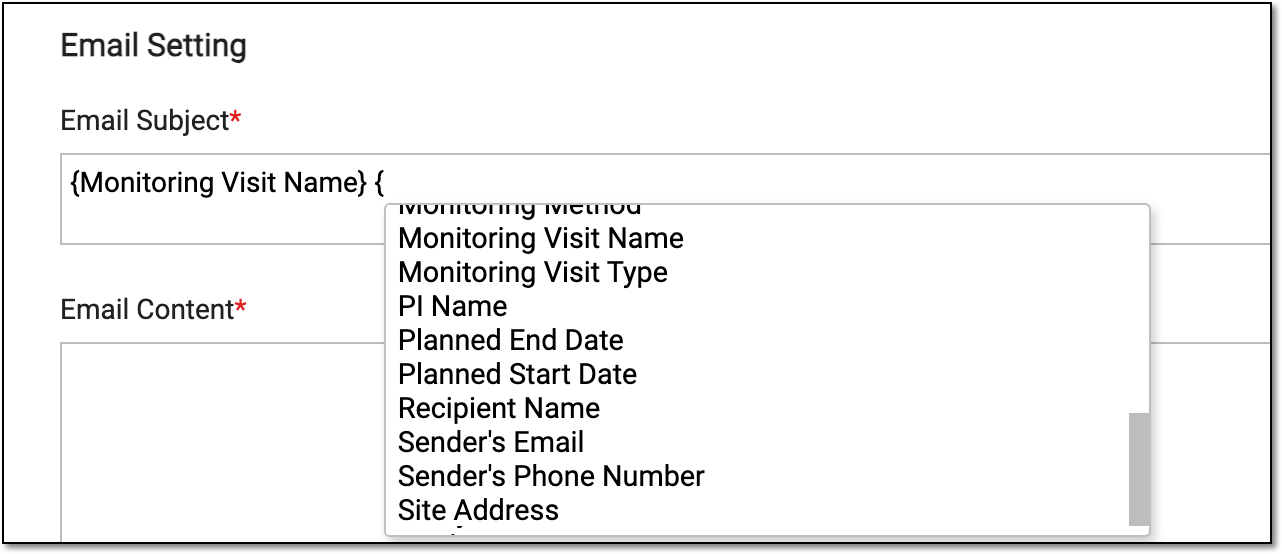 Figure 4. Adding placeholders to email subject
Note that the list of placeholders is generated depending on the selected template type so that only the relevant ones are
                                  available for selection.
Email Content*
Enter the content of the email body that is to be used as a template for sending task and query reminders. You can also start typing with the opening brace "{" to expand the list of predefined placeholders that you want to include in the email content to then be replaced with actual data in the resulting email
Note that the list of placeholders is generated depending on the selected template type so that only the relevant ones are
                                  available for selection.
Elements Setup
List of Payable Items
Select the checkboxes next to the payable item details that you want to be included in the email body in a form of a table. Clear the checkboxes next to the details that should not be included in the email.
For this placeholder, the system considers the list of payable items currently available in the EDC system.
 Figure 5. Displaying list of payable items to include into email
This list is applicable for the Payment Request Letter template type and only
                                  available if the {List of Payable Items} variable is added to the email content.
List of Open Issues Left from Previous Visit
Select the checkboxes next to the issue details that you want to be included in the email body in the form of a table. Clear the checkboxes next to the details that should not be included in the email; however, at least one checkbox must be selected.
For this placeholder, the system considers the issues in the Not Started or On-going status that were created and not resolved after the date of the previous monitoring visit.
 Figure 6. Displaying list of open issues from previous visit
This list is applicable for the Follow-up Letter template type and only available if
                                  the {List of Open Issues Left from Previous Visit} variable is added to the email content.
List of Action Items Left from Previous Visit
Select the checkboxes next to the action item details that you want to be included in the email body in the form of a table. Clear the checkboxes next to the details that should not be included in the email; however, at least one checkbox must be selected.
For this placeholder, the system considers the action items that were created after the date of the previous monitoring visit disregarding their status.
 Figure 7. Displaying list of action items from previous visit
This list is applicable for the Follow-up Letter and Confirmation Letter template types and only available if the {List of Action Items Left from Previous Visit} variable is added to the email content.List of Incomplete Action Items Left from Previous Visit
Select the checkboxes next to the action item details that you want to be included in the email body in the form of a table. Clear the checkboxes next to the details that should not be included in the email; however, at least one checkbox must be selected.
For this placeholder, the system considers the action items in the Not Started or On-going status that were created and not resolved after the date of the previous monitoring visit.
 Figure 8. Displaying list of incomplete action items from previous visit
This list is applicable for the Follow-up Letter and Confirmation Letter template types and only available if the {List of Incomplete Action Items Left from Previous Visit} variable is added to the email content.List of Incomplete Action Items
Select the checkboxes next to the action item details that you want to be included in the email body in the form of a table. Clear the checkboxes next to the details that should not be included in the email; however, at least one checkbox must be selected.
For this placeholder, the system considers the action items in the Not Started or On-going status disregarding their creation date.
 Figure 9. Displaying list of incomplete action items
This list is applicable for the Follow-up Letter and Confirmation Letter template types and only available if the {List of Incomplete Action Items} variable is added to the email content.List of Attendance
Select the checkboxes next to the attendee details that you want to be included in the email body in the form of a table. Clear the checkboxes next to the details that should not be included in the email; however, at least one checkbox must be selected.
For this placeholder, the system populates the values based on the attendee details added as predefined items to the monitor template that is then associated with the trip report and completed with actual attendee information.
 Figure 10. Displaying list of attendance
This list is applicable for the Follow-up Letter template type and only available if
                                  the {List of Attendance} variable is added to the email content.
SAVE
Select
 to implement your changes.
 -
Upon saving, the email template is created and it appears in the Email Template table with the Active status. You may now use the created template according to your business needs in the CTMS system.