Create payment approval workflow
In CTMS, you can create a workflow to outline the procedure of the payment request audit according to the study protocol or sponsor's requirements. This workflow is a series of user actions and system behaviours that must be performed to validate the trip report.
For example, for processing payment requests, the tasks included in the workflow can be the following: Submit, Approve, Sign, and End. Thus, when a payment is submitted, then the system automatically sends a notification to the designated personnel to acquire their approval on the submitted payment. If approved, then the system sends another notification to the assignee to acquire their signature on the submitted payment. Once signed, only then the workflow ends, and the payment process is completed.
-
In the CTMS application header, select the LIBRARY tab.
-
On the page that opens, from the left pane, select the Workflow Setting subtab (if not opened by default).
 Figure 1. Accessing workflow setting
-
On the Workflow List page that opens, from the workspace toolbar, select New Item
 .
From the dropdown menu that appears, select Payment.
.
From the dropdown menu that appears, select Payment. Figure 2. Selecting payment approval workflow type
-
On the page that opens, enter the basic details of your workflow as explained in the following table.
 Figure 3. Entering basic details for payment approval workflow
Tip
In the following table, mandatory elements are marked with an asterisk (*).
Element
Details
Name*
Enter a unique name for your workflow.
Applicable Study*
Select the study or studies in which you want to use the workflow you are creating.
In the dropdown menu, turn the Apply to All toggle on or off. When off, you can choose a specific study for your workflow. Else, turn the toggle on to use the workflow in all the CTMS studies. Then select SAVE.
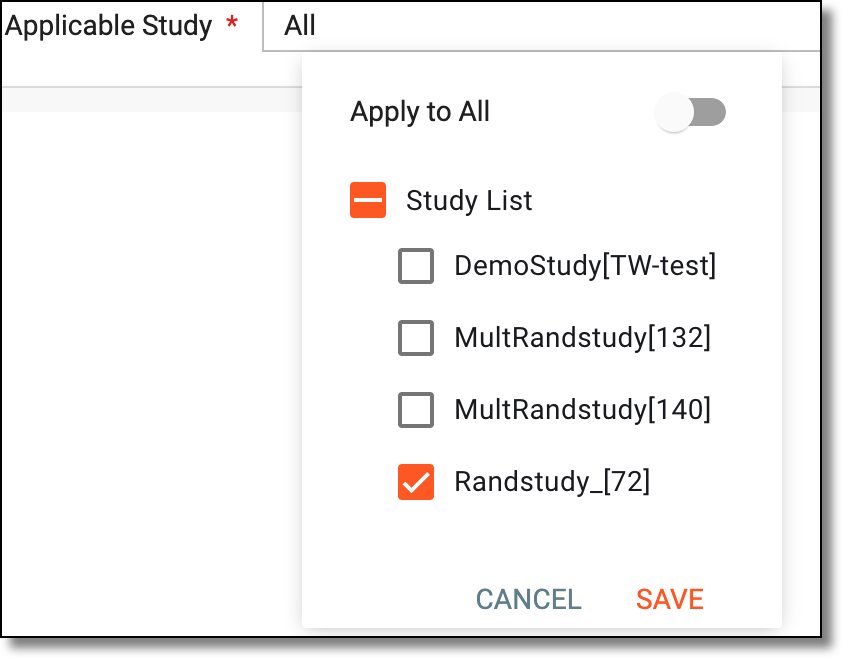 Figure 4. Selecting study
Type
Represents the Payment type selected in step 3 of this procedure.
-
Now in the workflow designer, start configuring the workflow by dragging the required task node from the left pane to the designer pane.
The significance of each task node is explained in the following table.
Tip
You may skip the configuration and proceed directly to saving your workflow. You can edit the workflow and complete the configurations later as needed.
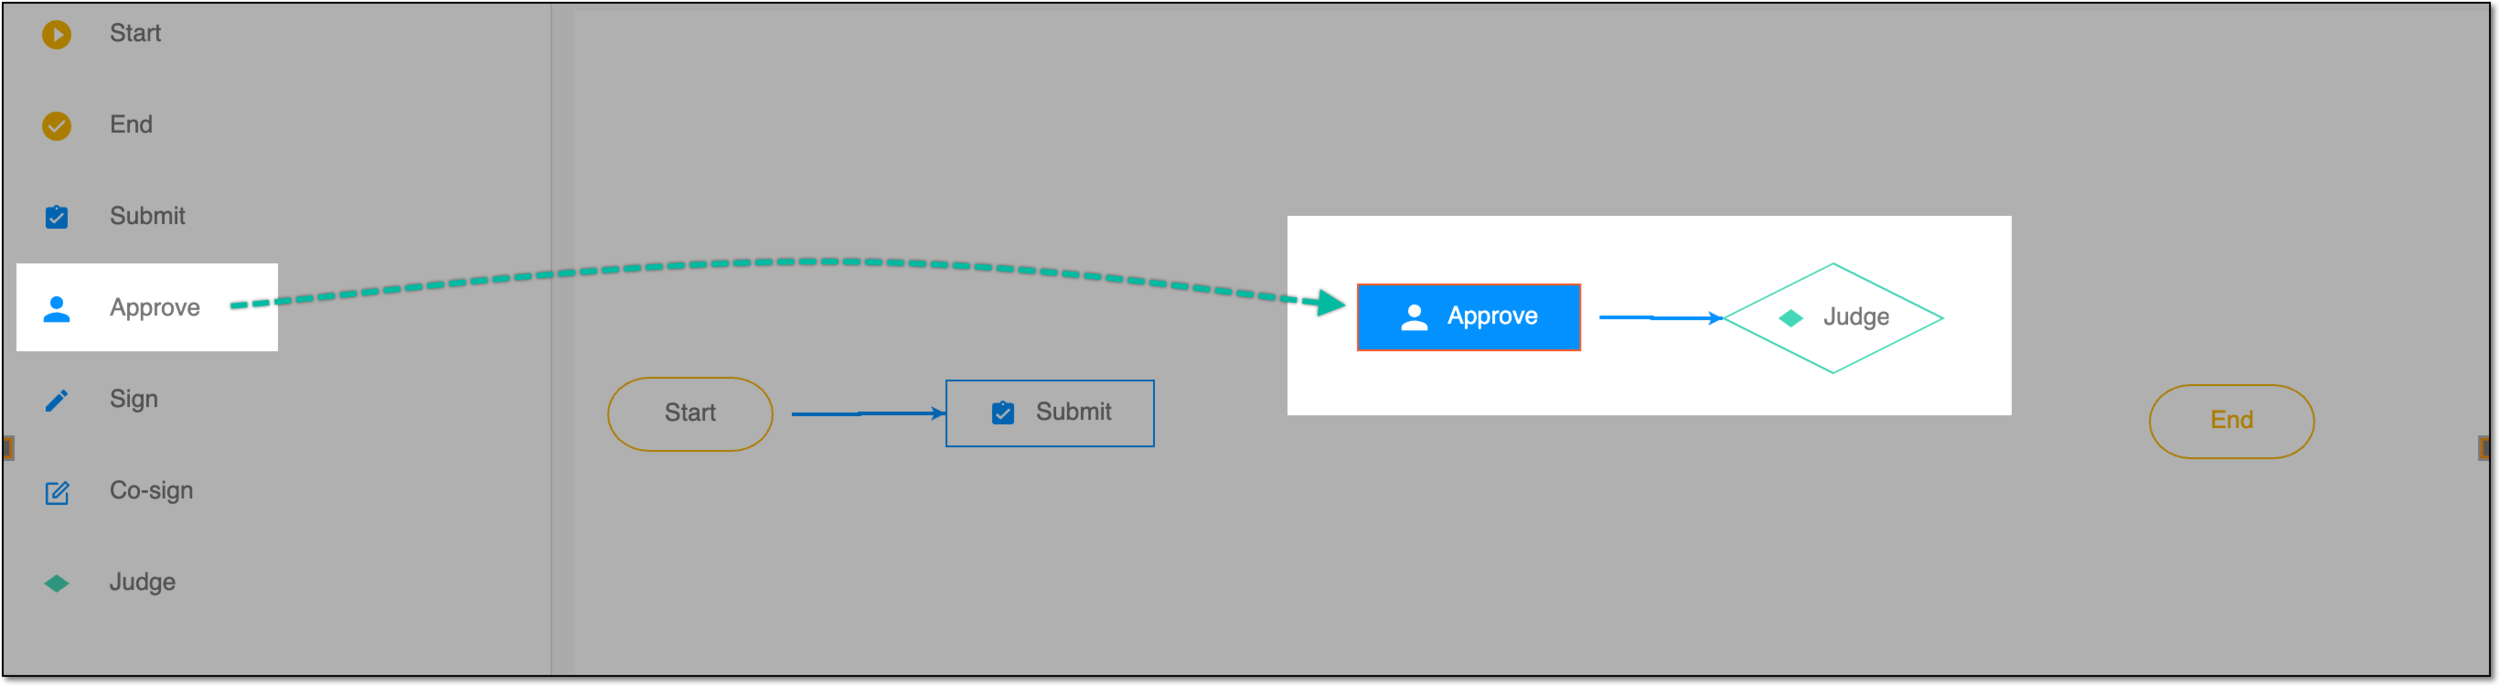 Figure 5. Dragging task to workflow designer pane
Important
When designing the workflow, note that the Payment workflow can be created with only Start, Submit, Pay, and End nodes, meaning that its approval is handled during payment request audit in EDC, and in CTMS, you can directly pay the request.
Element
Details
Start

Represents the beginning of the workflow process.
Whenever you create a workflow, this node is added by default; this node is mandatory to add to every workflow.End

Represents the end or completion of the workflow process.
Whenever you create a workflow, this node is added by default; this node is mandatory to add to every workflow.Submit

Represents that an action has been submitted.
For example, this task is executed when a payment request is submitted.
Whenever you create a workflow, this node is added by default.Approve

Add the node to your workflow if, at a certain point, the action requires approval from designated personnel, such as a data manager (DM), principal investigator (PI), or others.
For example, you require the DM to approve the payment request upon submission.
When you add the Approve node, the Judge node is added with it by default. This is because the action can have two possible outcomes: approved or rejected, and the Judge node provides you with these options:
Sign

Add the node to your workflow if, at a certain point, the action requires a signature from designated personnel, such as a DM, PI, or others.
For example, you may require the PI to sign the payment request upon approval.
When you add the Sign node, the Judge node is added with it by default. This is because the action can have two possible outcomes: signature or rejection, and the Judge node provides you with these options:
Pay

Add the node to your payment approval workflow to reflect the stage of issuing the financial compensation, who is in charge of it, and the other details.
Judge

Represents tasks that can have successful or unsuccessful outcomes. This node includes Y (yes) and N (no) task nodes, using which you can define the corresponding task to execute when the task linked to the Judge node is successfully completed or it is unsuccessful, respectively.
For example, once the payment request goes to the approval stage, the assignee can judge whether to approve or reject and, based on their judgment, the workflow dictates the following step—signature for a successful outcome or back to submission for rejection.
-
Once a task node is added, link it to the required node by hovering over the node that you want to link (input node) and using the gray dots that appear to connect it to the desired output node.
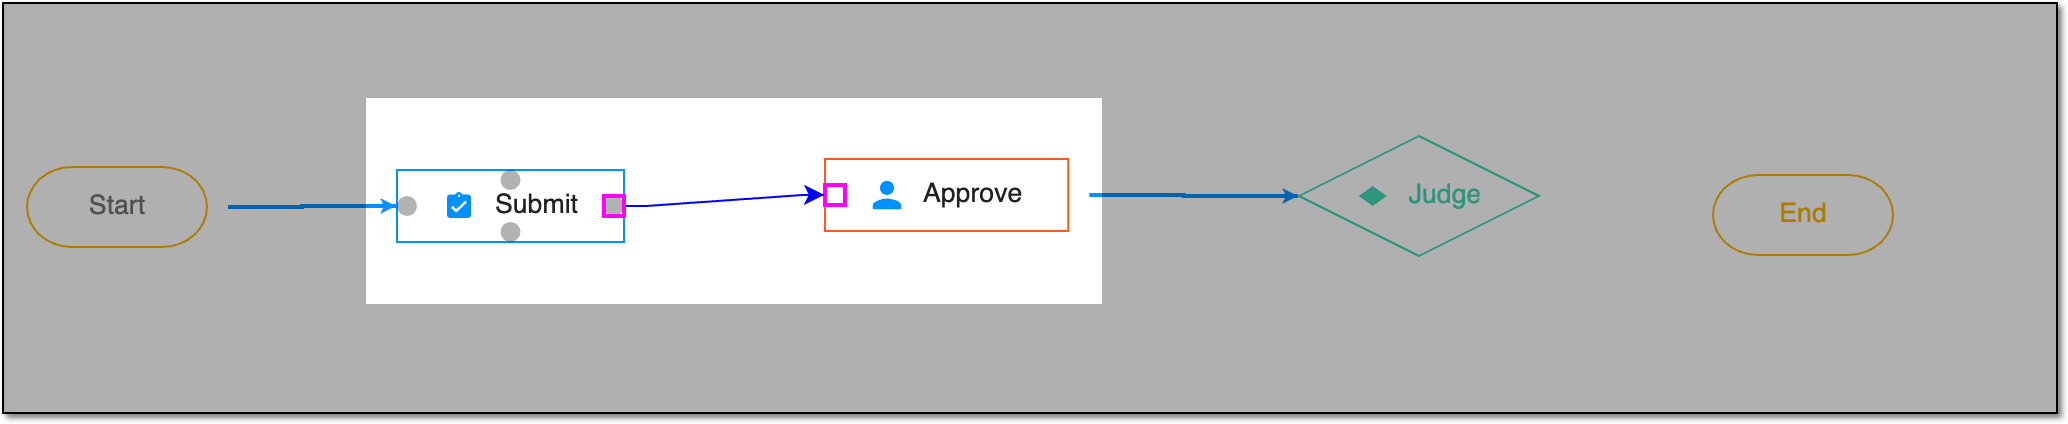 Figure 6. Linking workflow task nodes
Important
There are some restrictions for node linking:
-
The Start node cannot be targeted by any other node's linking arrow. This ensures that the workflow does not restart over and over getting into a loop.
-
The End node cannot target any other node with the linking arrow. This ensures that the workflow is finalized and does not trigger any processes once all the stages are passed.
-
The Submit, Approve, Sign, and Pay nodes cannot have only one consecutive node after them. This ensures that these types of operations have the Judge and at least one more stage after them.
-
-
For the Judge node, link the Y and N nodes—that represent successful and unsuccessful completion of the associated task—separately as follows:
-
Select either Y or N node as required.
-
Hover over the Judge node and select the gray dot that appears to connect it to the desired output node.
For example, as shown in the following figure, the link is added for ending the workflow when the action is approved.
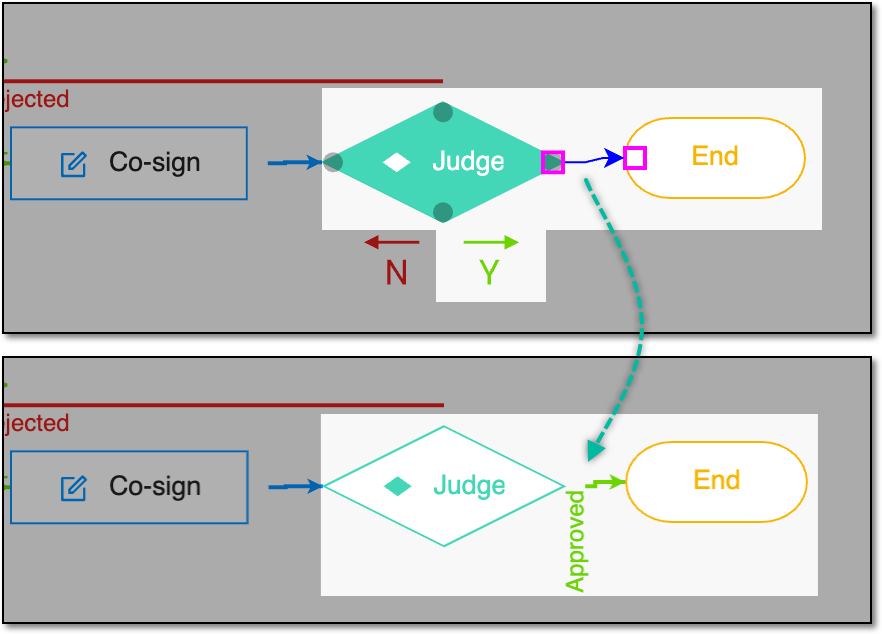 Figure 7. Linking Judge node example
-
-
After the task nodes are linked, add or modify details for the Submit, Approve, Sign, and Pay task nodes (if added). To add the details, double-click the task node or select the task node and then from the workspace toolbar, select Edit
 .
. -
In the panel that expands, configure the task node details as follows.
The available settings of the Submit node are explained in the following table.
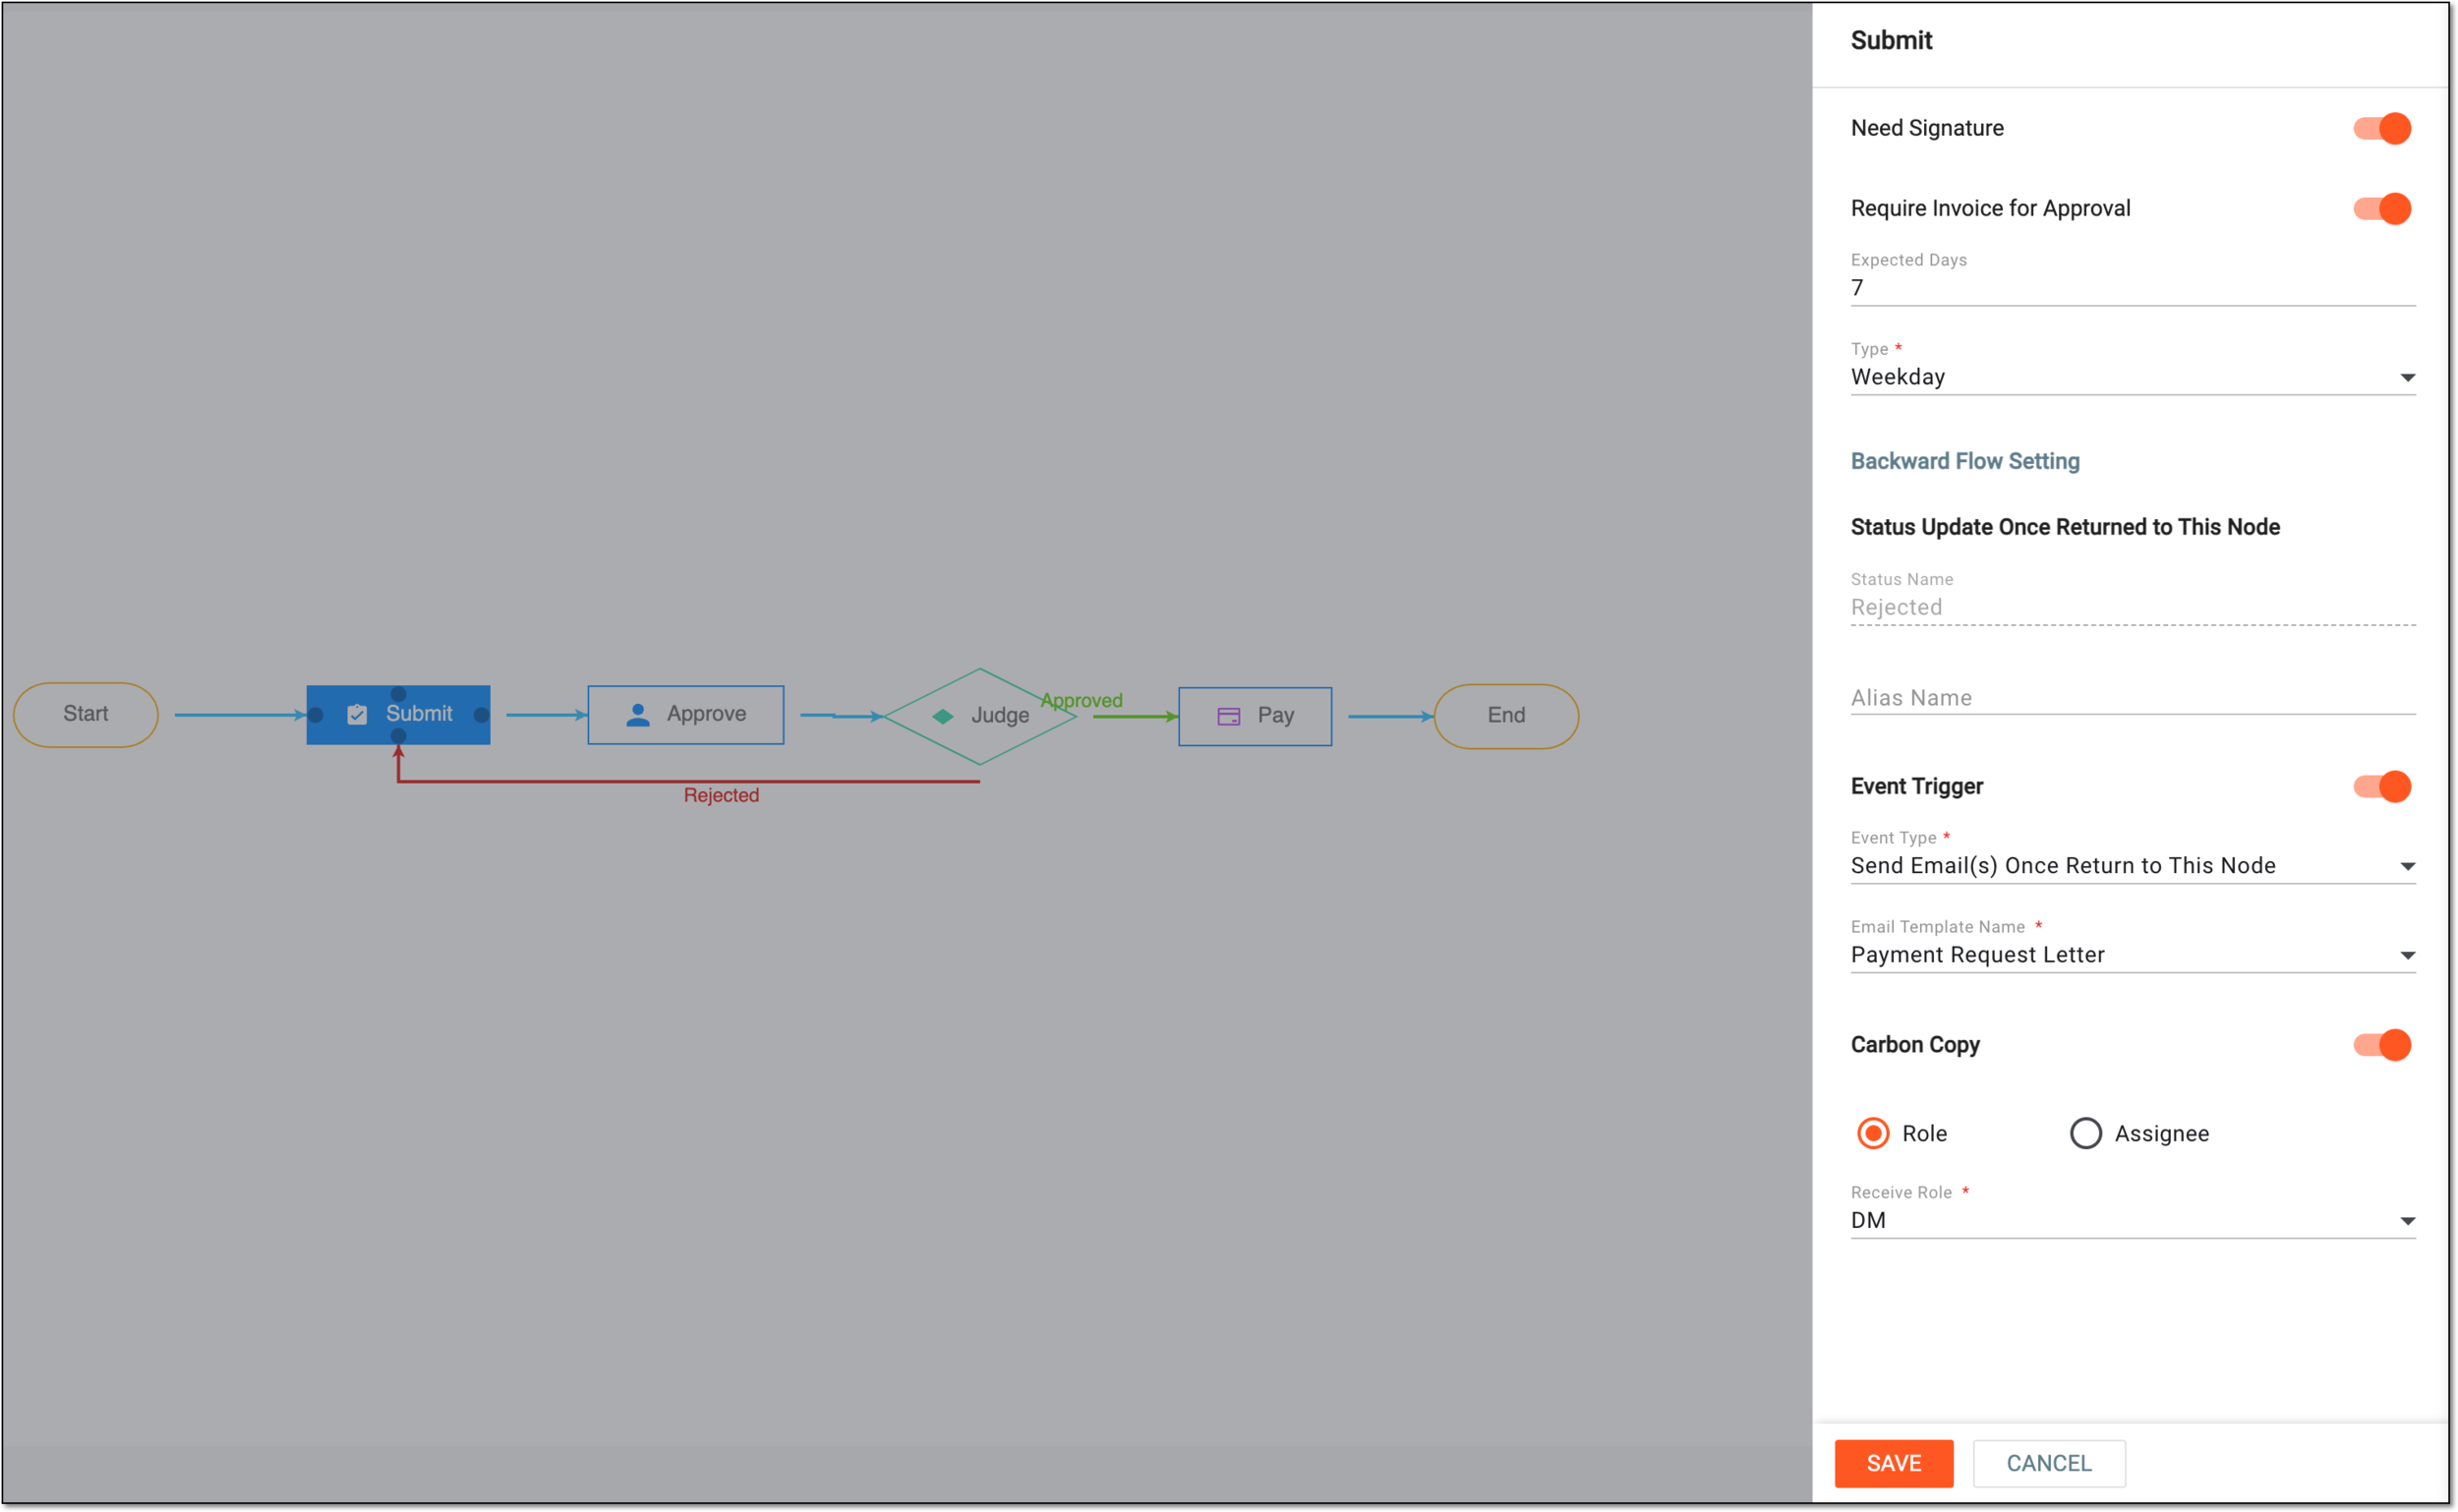 Figure 8. Configuring submit node details
Tip
In the following table, mandatory elements are marked with an asterisk (*).
Element
Details
Need Signature
Turn the toggle on if your action requires a signature from the submitter of the task.
Require Invoice for Approval
Turn the toggle on if the payment stage requires uploading the invoice file.
Expected Days
Enter the number of days to establish the deadline for this stage completion.
Type*
Select how the days must be counted for the deadline of this stage completion—only weekdays or calendar days.
Backward Flow Setting
Status Update Once Returned to This Node
Status Name
Represents the name of the status associated with the task when reaching the stage of the Submit node.
For instance, for the payment approval workflow, once the payment is submitted, its status is Submitted.
Alias Name
Enter the alternative name of the selected task node that appears when the stage of the workflow represented by the Submit node is completed.
For instance, the submission operation for a payment requires a signature. If the alternative name of Submitted can be Submitted and Signed, then once the signature task is completed, the status of the trip report appears as Submitted and Signed.
Event Trigger
Turn this toggle on if you want the system to notify the personnel responsible for completing the Submit workflow stage on a certain event.
Event Type*
Select the type of event for which you want to send an email notification. For the Submit node, the available event type is Send Email(s) Once Return to This Node.
Email Template Name*
Select the previously configured email template according to which the notification is sent to a recipient.
Carbon Copy
Turn this toggle on if you want the system to add recipients of the copy of the notification letter sent to the personnel responsible for completing the Submit workflow stage.
Role
Select this option if you want the representatives of a certain system role, such as DM, PI, or else, to be the recipients of the notification letter copy. Then in the Receive Role field, select the roles to be the recipient of the email.
Assignee
Select this option if you want a certain person to be the recipients of the notification letter copy. Then in the User Name field, select the recipients of the email.
SAVE
Select
 to implement your changes.
CANCEL
Select
 to discard your changes and return to the workflow designer.
The available settings of the Approve node are explained in the following table.
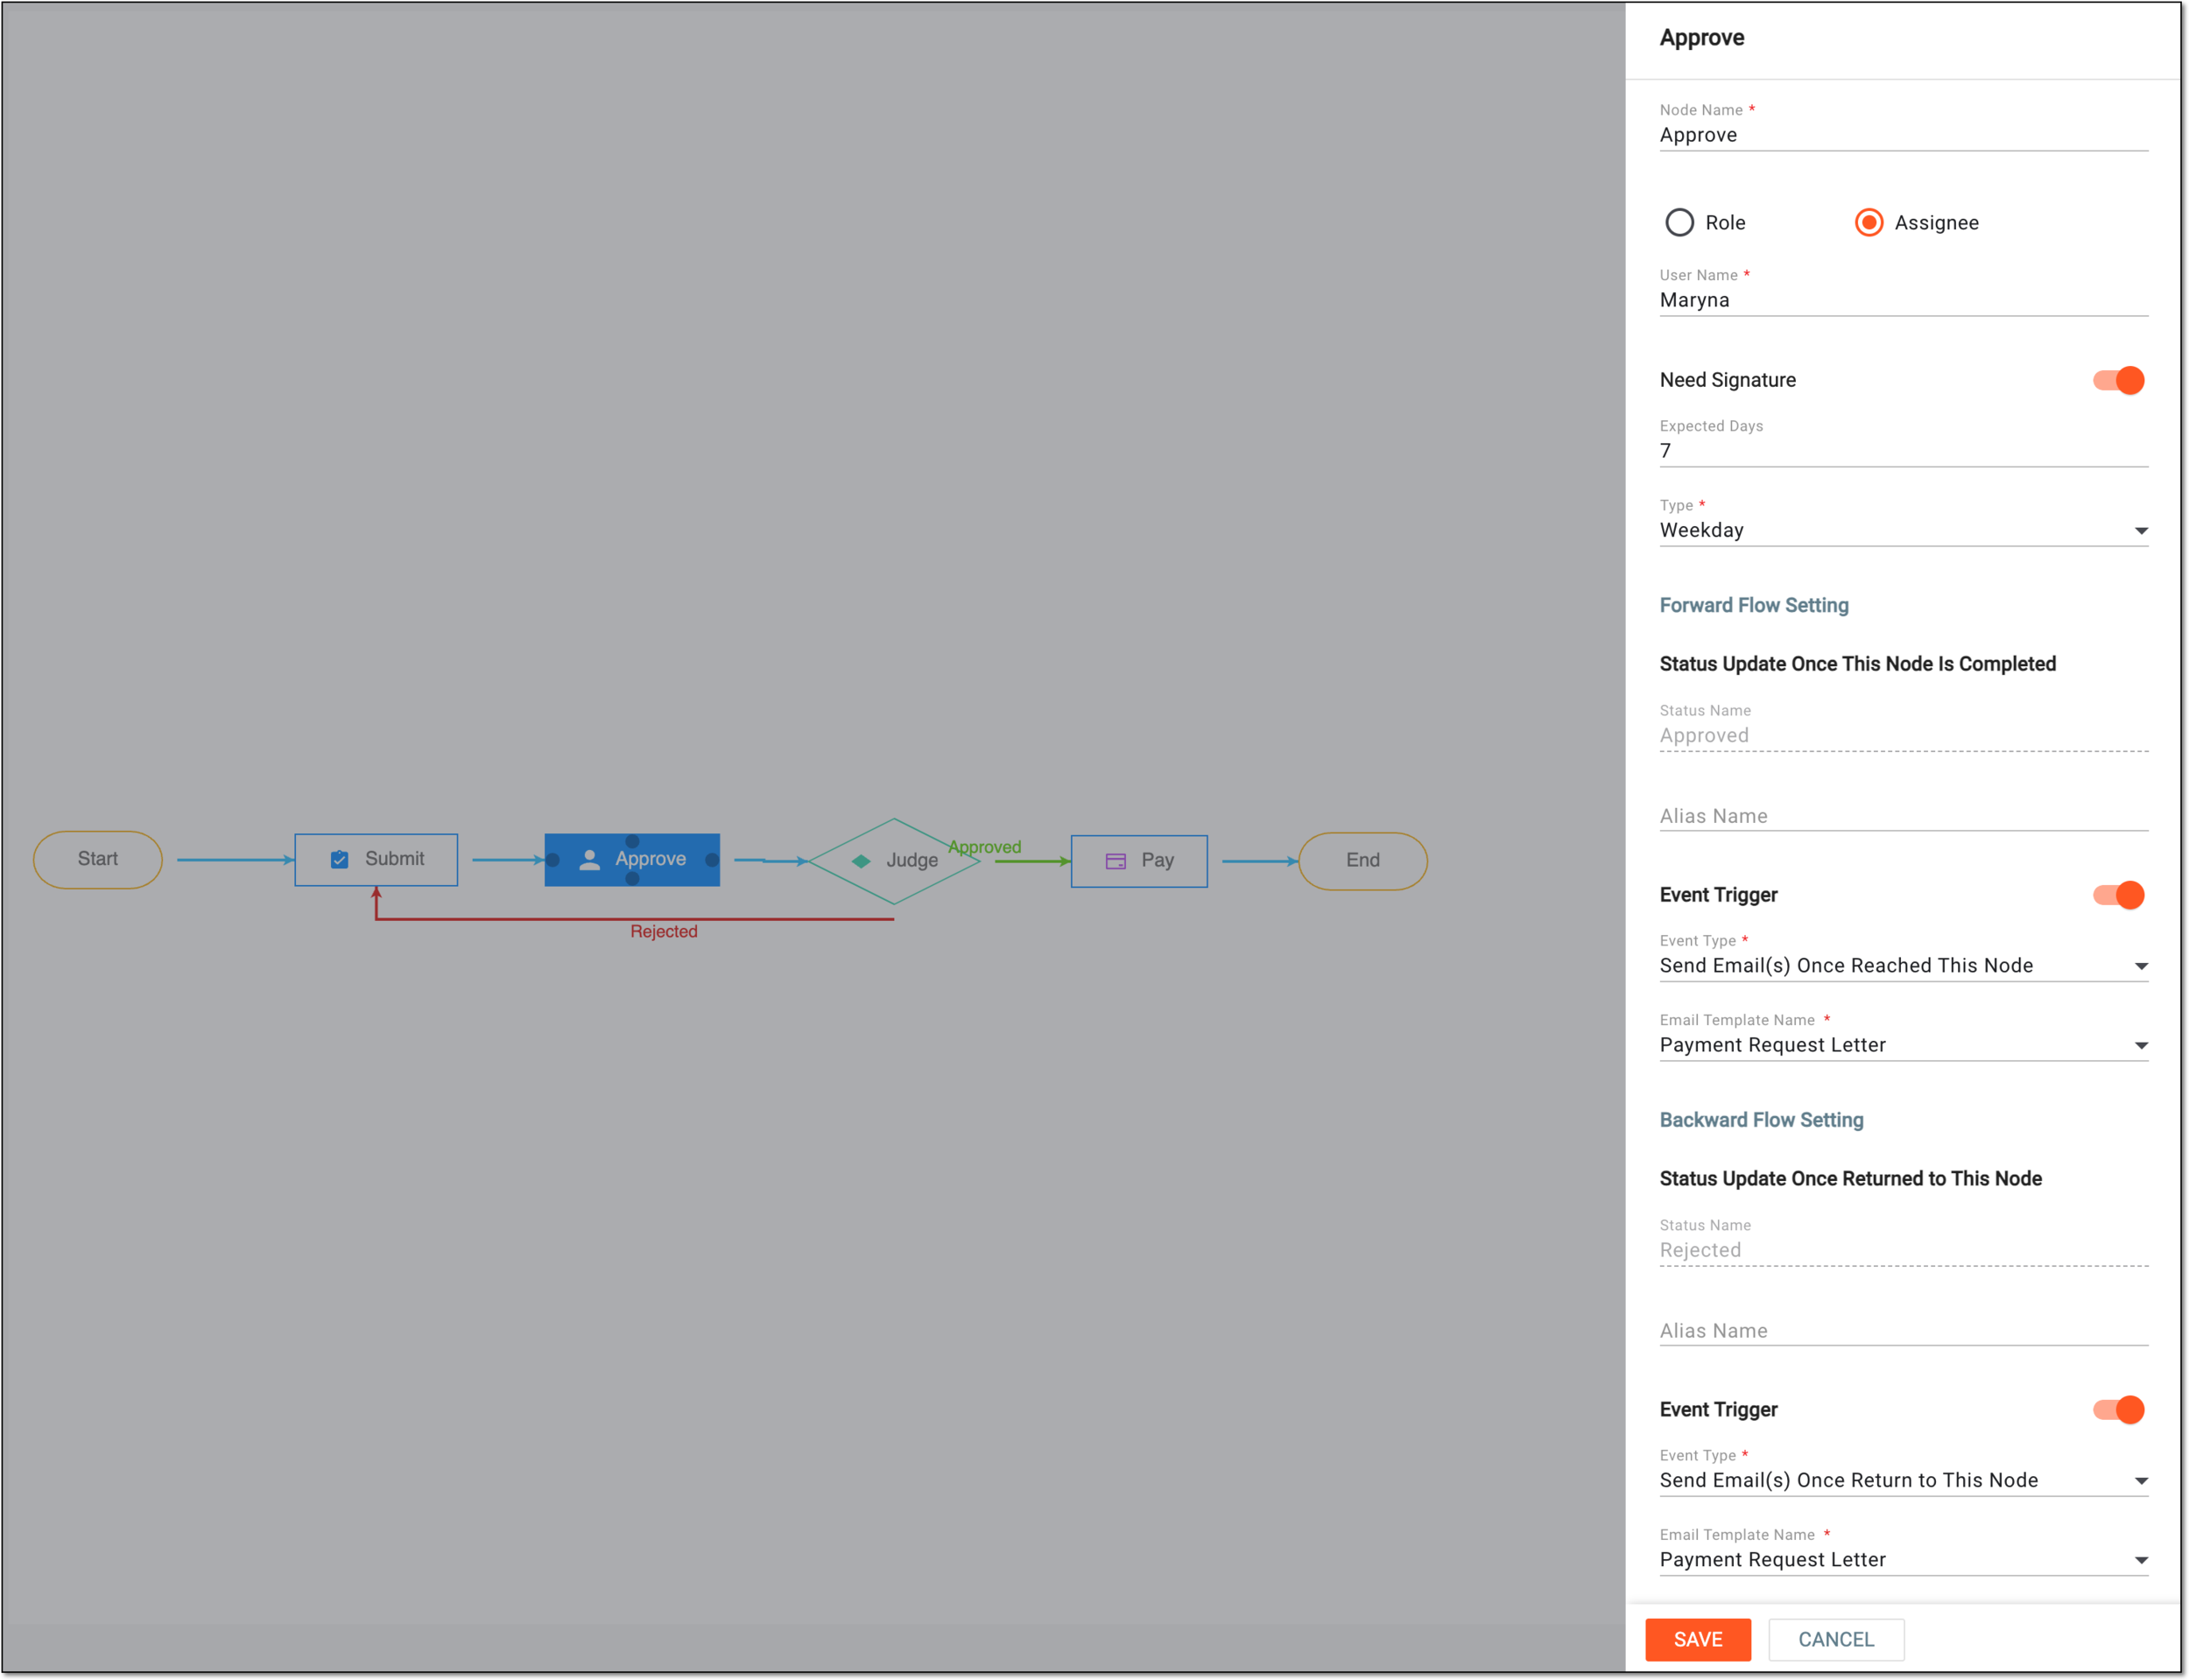 Figure 9. Configuring approval node details
Tip
In the following table, mandatory elements are marked with an asterisk (*).
Element
Details
Node Name*
Enter the name of the task node.
Role
Select this option if your action requires seeking approval from a role, such as DM, PI, or others. Then from the Role dropdown list that appears, select the required role.
Assignee
Select this option if your action requires seeking approval from a specified user. Then in the User Name field that appears, select the required users.
Need Signature
Turn the toggle on if your action requires a signature from the submitter of the task.
Expected Days
Enter the number of days to establish the deadline for this stage completion.
Type*
Select how the days must be counted for the deadline of this stage completion—only weekdays or calendar days.
Forward Flow Setting
Status Update Once This Node Is Completed
Status Name
Represents the name of the status associated with the task when reaching the stage of the Approve node.
For instance, for the payment approval workflow, once the payment is ready for approval, its status changes to Approve.
Alias Name
Enter the alternative name of the selected task node that appears when the stage of the workflow represented by the Approve node is completed.
For instance, if the alternative name of Approve is Approved, then once the approval task is completed, the status appears as Approved.
Event Trigger
Turn this toggle on if you want the system to notify the personnel responsible for completing the Approve workflow stage on a certain event.
Event Type*
Select the type of event for which you want to send an email notification. For the Approve node, the available event type is Send Email(s) Once Reached the Node.
Email Template Name*
Select the previously configured email template according to which the notification is sent to a recipient.
Backward Flow Setting
Status Update Once Returned to This Node
Status Name
Represents the name of the status associated with the task when returning to this stage of the workflow.
For instance, the payment request, after being approved by one user, becomes rejected at the signature stage by another. According to the configured logic, it returns back to the approval stage and its status changes to Rejected.
Alias Name
Enter the alternative name of the selected task node that appears when the workflow returns to this stage.
Event Trigger
Turn this toggle on if you want the system to notify the personnel responsible for completing the Approve workflow stage once the workflow returns back to this stage.
Event Type*
Select the type of event for which you want to send an email notification. For the Approve node, the available event type is Send Email(s) Once Return to This Node.
Email Template Name*
Select the previously configured email template according to which the notification is sent to a recipient.
SAVE
Select
to save your changes.CANCEL
Select
to discard your changes and return to the workflow designer.The available settings of the Sign node are explained in the following table.
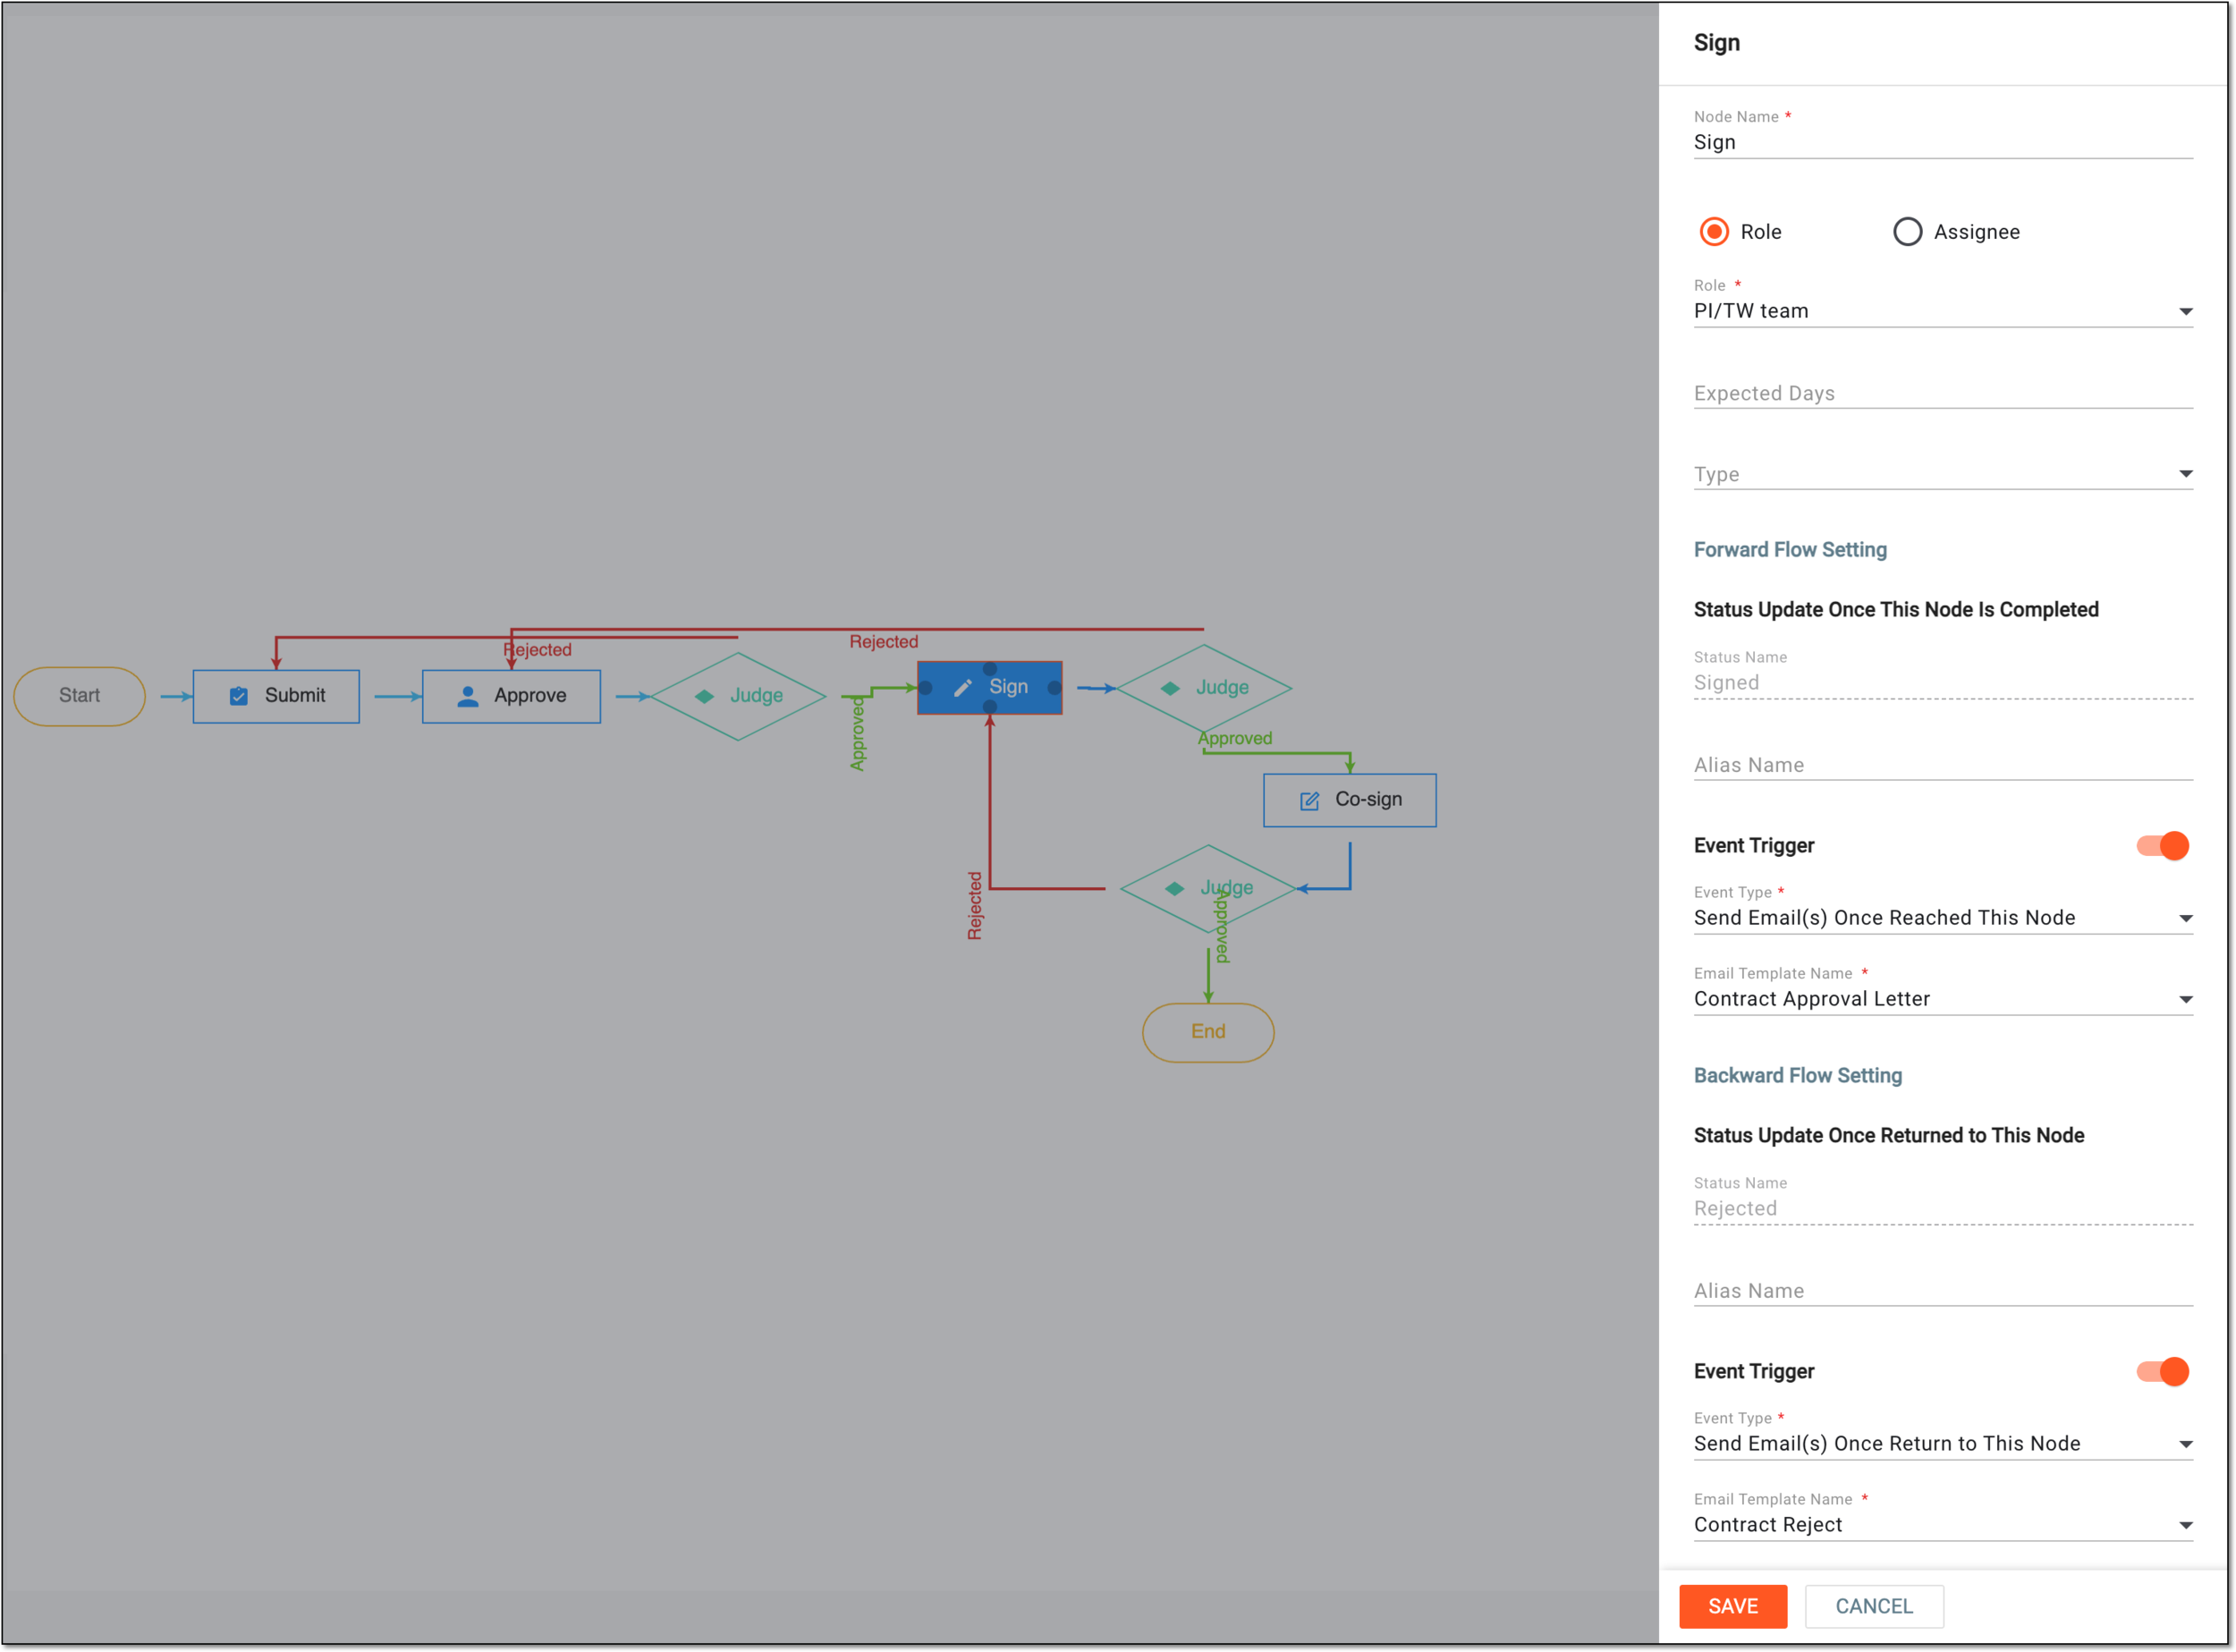 Figure 10. Configuring signature node details
Tip
In the following table, mandatory elements are marked with an asterisk (*).
Element
Details
Node Name*
Enter the name of the task node.
Role
Select this option if your action requires seeking approval from a role, such as DM, PI, or others. Then from the Role dropdown list that appears, select the required role.
Assignee
Select this option if your action requires seeking approval from a specified user. Then in the User Name field that appears, select the required users.
Expected Days
Enter the number of days to establish the deadline for this stage completion.
Type*
Select how the days must be counted for the deadline of this stage completion—only weekdays or calendar days.
Forward Flow Setting
Status Update Once This Node Is Completed
Status Name
Represents the name of the status associated with the task when reaching the stage of the Sign node.
For instance, for the payment approval workflow, once the payment is ready for signature, its status changes to Sign.
Alias Name
Enter the alternative name of the selected task node that appears when the stage of the workflow represented by the Sign node is completed.
For instance, if the alternative name of Sign is Signed, then once the signature task is completed, the status appears as Signed.
Event Trigger
Turn this toggle on if you want the system to notify the personnel responsible for completing the Sign workflow stage on a certain event.
Event Type*
Select the type of event for which you want to send an email notification. For the Sign node, the available event type is Send Email(s) Once Reached the Node.
Email Template Name*
Select the previously configured email template according to which the notification is sent to a recipient.
Backward Flow Setting
Status Update Once Returned to This Node
Status Name
Represents the name of the status associated with the task when the workflow is returned back to this node.
For instance, after being signed by one user, the payment request becomes rejected at the co-signature stage by another. According to the configured logic, it returns back to the signature stage and its status changes to Rejected.
Alias Name
Enter the alternative name of the selected task node that appears when the workflow returns to this stage.
Event Trigger
Turn this toggle on if you want the system to notify the personnel responsible for completing the Sign stage once the workflow returns to it.
Event Type*
Select the type of event for which you want to send an email notification. For the Sign node, the available event type is Send Email(s) Once Return to This Node.
Email Template Name*
Select the previously configured email template according to which the notification is sent to a recipient.
SAVE
Select
to implement your changes.CANCEL
Select
to discard your changes and return to the workflow designer.The available settings of the Pay node are explained in the following table.
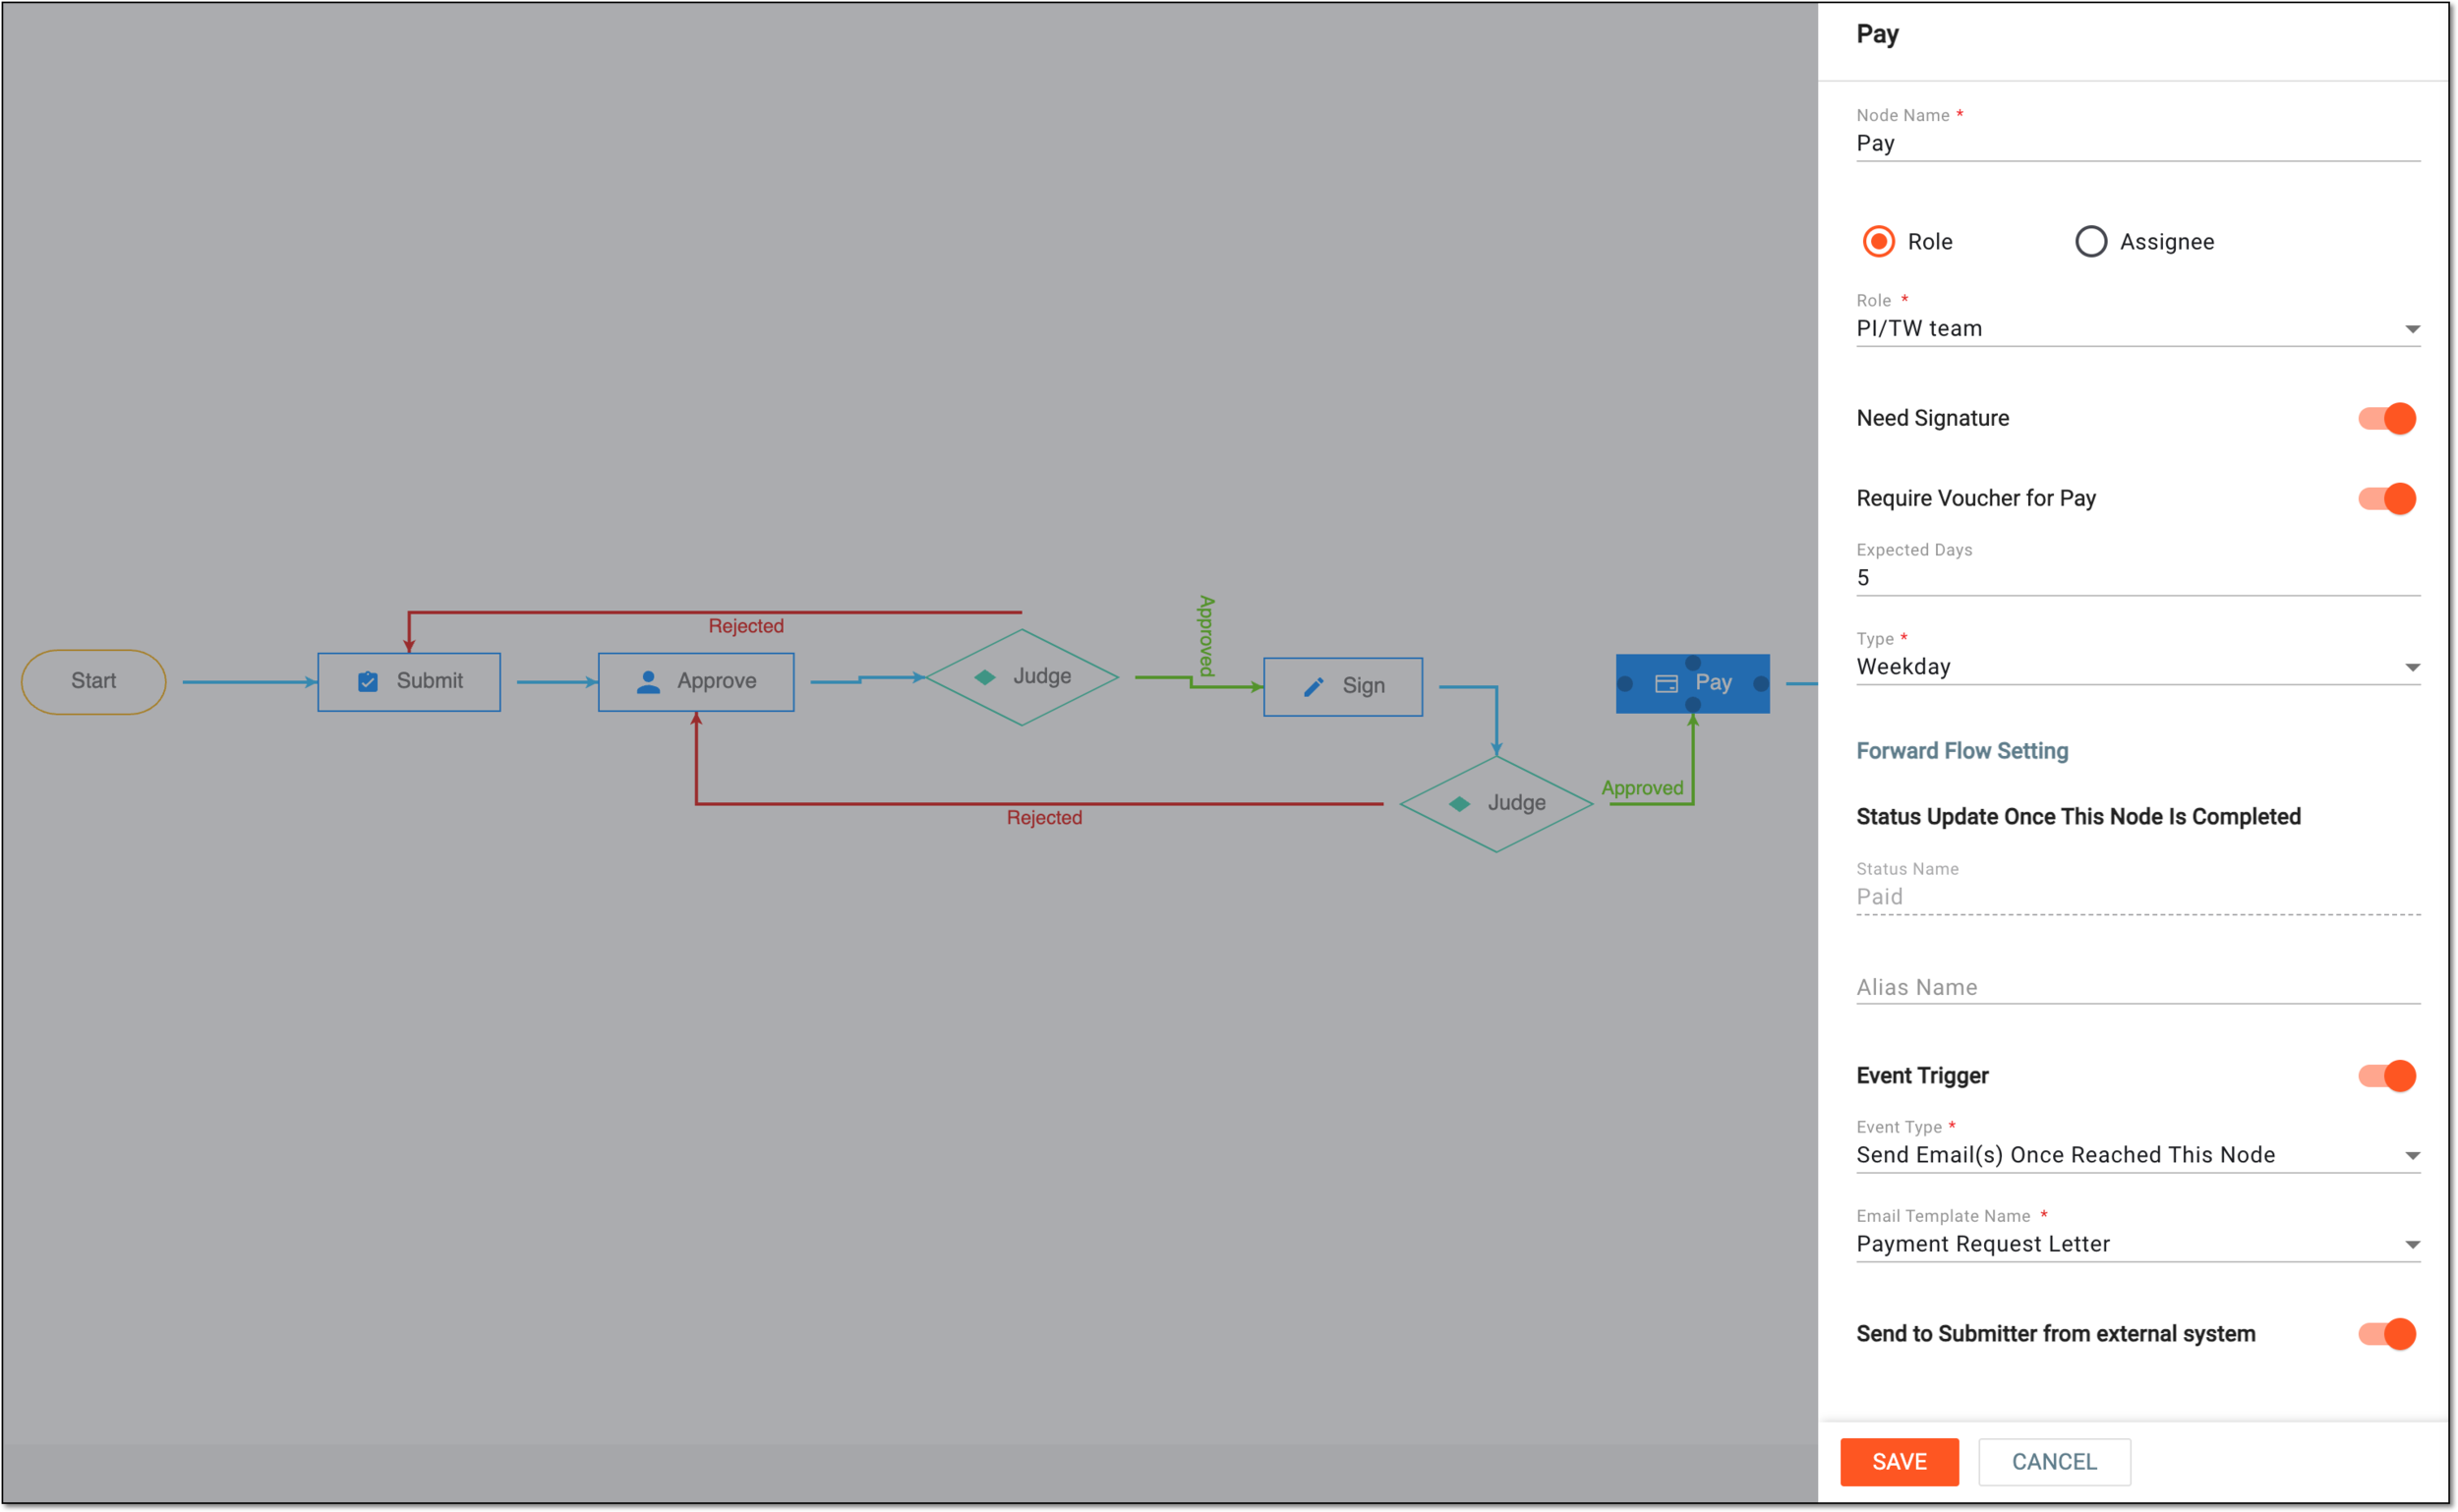 Figure 11. Configuring pay node details
Tip
In the following table, mandatory elements are marked with an asterisk (*).
Element
Details
Node Name*
Enter the name of the task node.
Role
Select this option if the payment can be made by the representative of a system role, such as DM, PI, or others. Then from the Role dropdown list that appears, select the required role.
Assignee
Select this option if the payment can be made by a specified user. Then in the User Name field that appears, select the required users.
Need Signature
Turn the toggle on if your action requires a signature from the submitter of the task.
Require Voucher for Pay
Turn this toggle on if upon executing payment you want to enable the file attachment feature to provide payment voucher or invoice copy.
Expected Days
Enter the number of days to establish the deadline for this stage completion.
Type*
Select how the days must be counted for the deadline of this stage completion—only weekdays or calendar days.
Forward Flow Setting
Status Update Once This Node Is Completed
Status Name
Represents the name of the status associated with the task when reaching the stage of the Pay node.
Alias Name
Enter the alternative name of the selected task node that appears when the stage of the workflow represented by the Pay node is completed.
Event Trigger
Turn this toggle on if you want the system to notify the personnel responsible for completing the Pay workflow stage on a certain event.
Event Type*
Select the type of event for which you want to send an email notification. For the Co-sign node, the available event type is Send Email(s) Once Reached the Node.
Email Template Name*
Select the previously configured email template according to which the notification is sent to a recipient.
Send to Submitter from external system
Turn this toggle on to enable the functionality to enter third-party representative contacts upon payment to notify them of the operation.
SAVE
Select
to implement your changes.CANCEL
Select
to discard your changes and return to the workflow designer. -
Once you have designed the workflow, from the workspace toolbar of the workflow designer, select Save
 .
.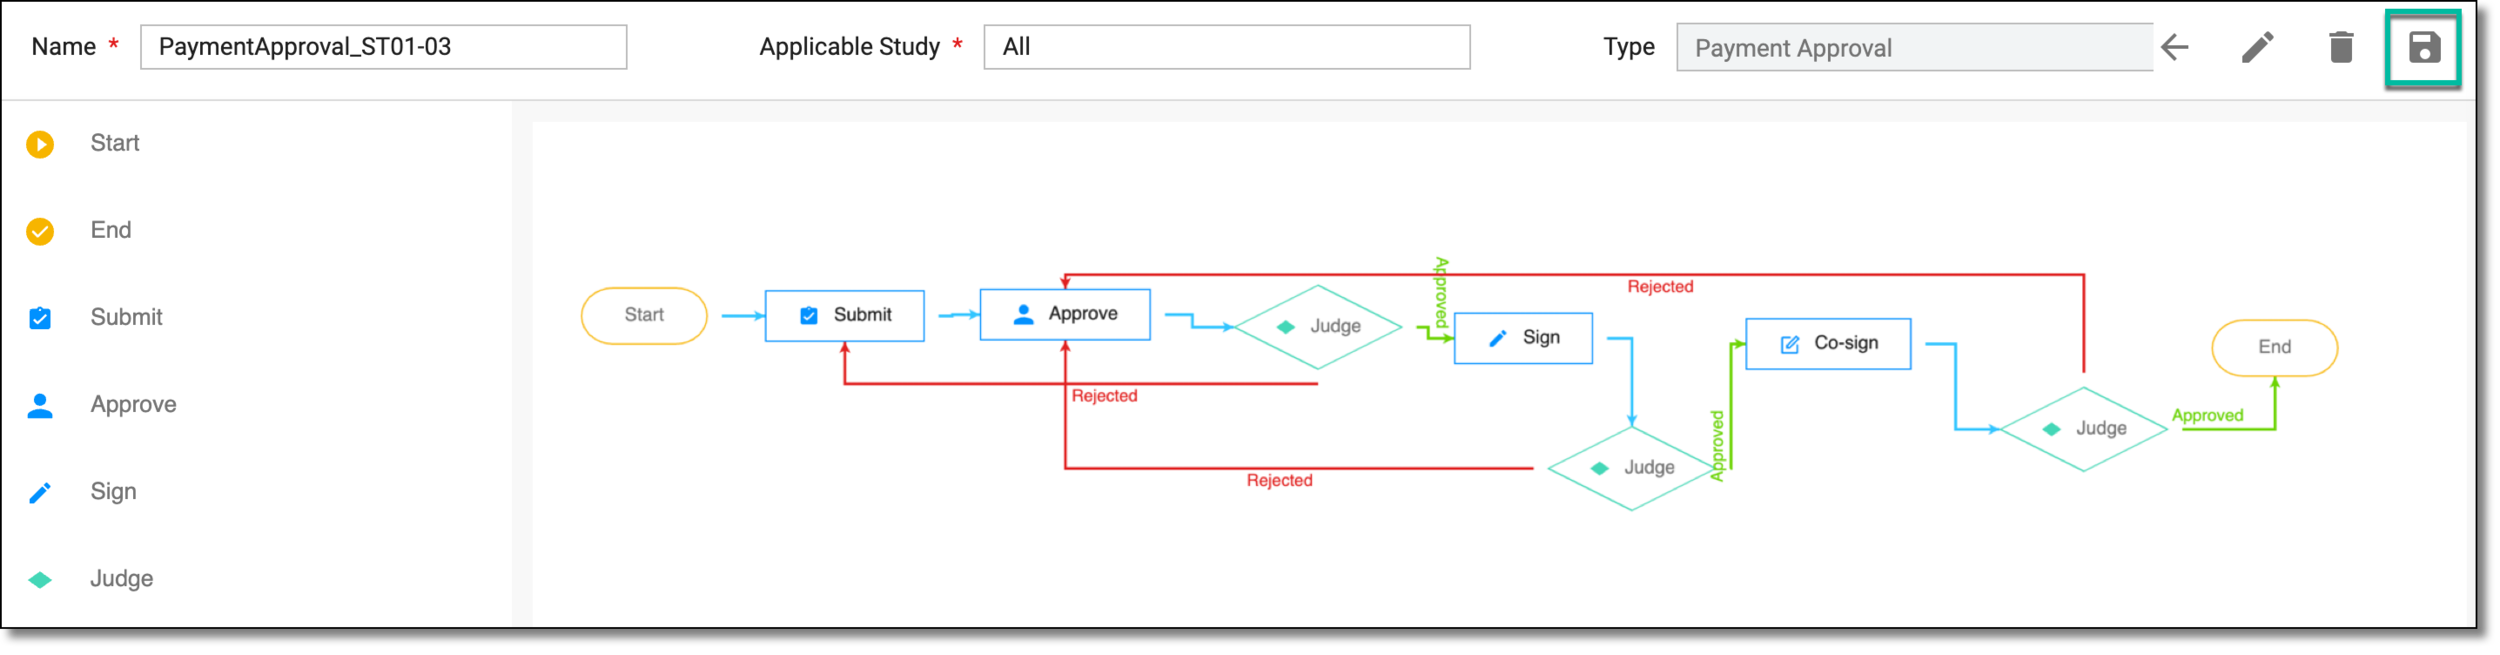 Figure 12. Saving payment approval workflow
Once saved, the workflow is created. You can now use it for payment request auditing in CTMS.