Blinding configuration
Blinding Configuration is a feature of CTMS designed to prevent the occurrence of conscious or unconscious bias in the conduct of clinical trials and to avoid sensitive information unblinding. This becomes possible by concealing the specific study information from certain groups of CTMS users, controlling access in a flexible and precise manner.
Important
Blinding configuration becomes available only if blinding control is enabled for the study.
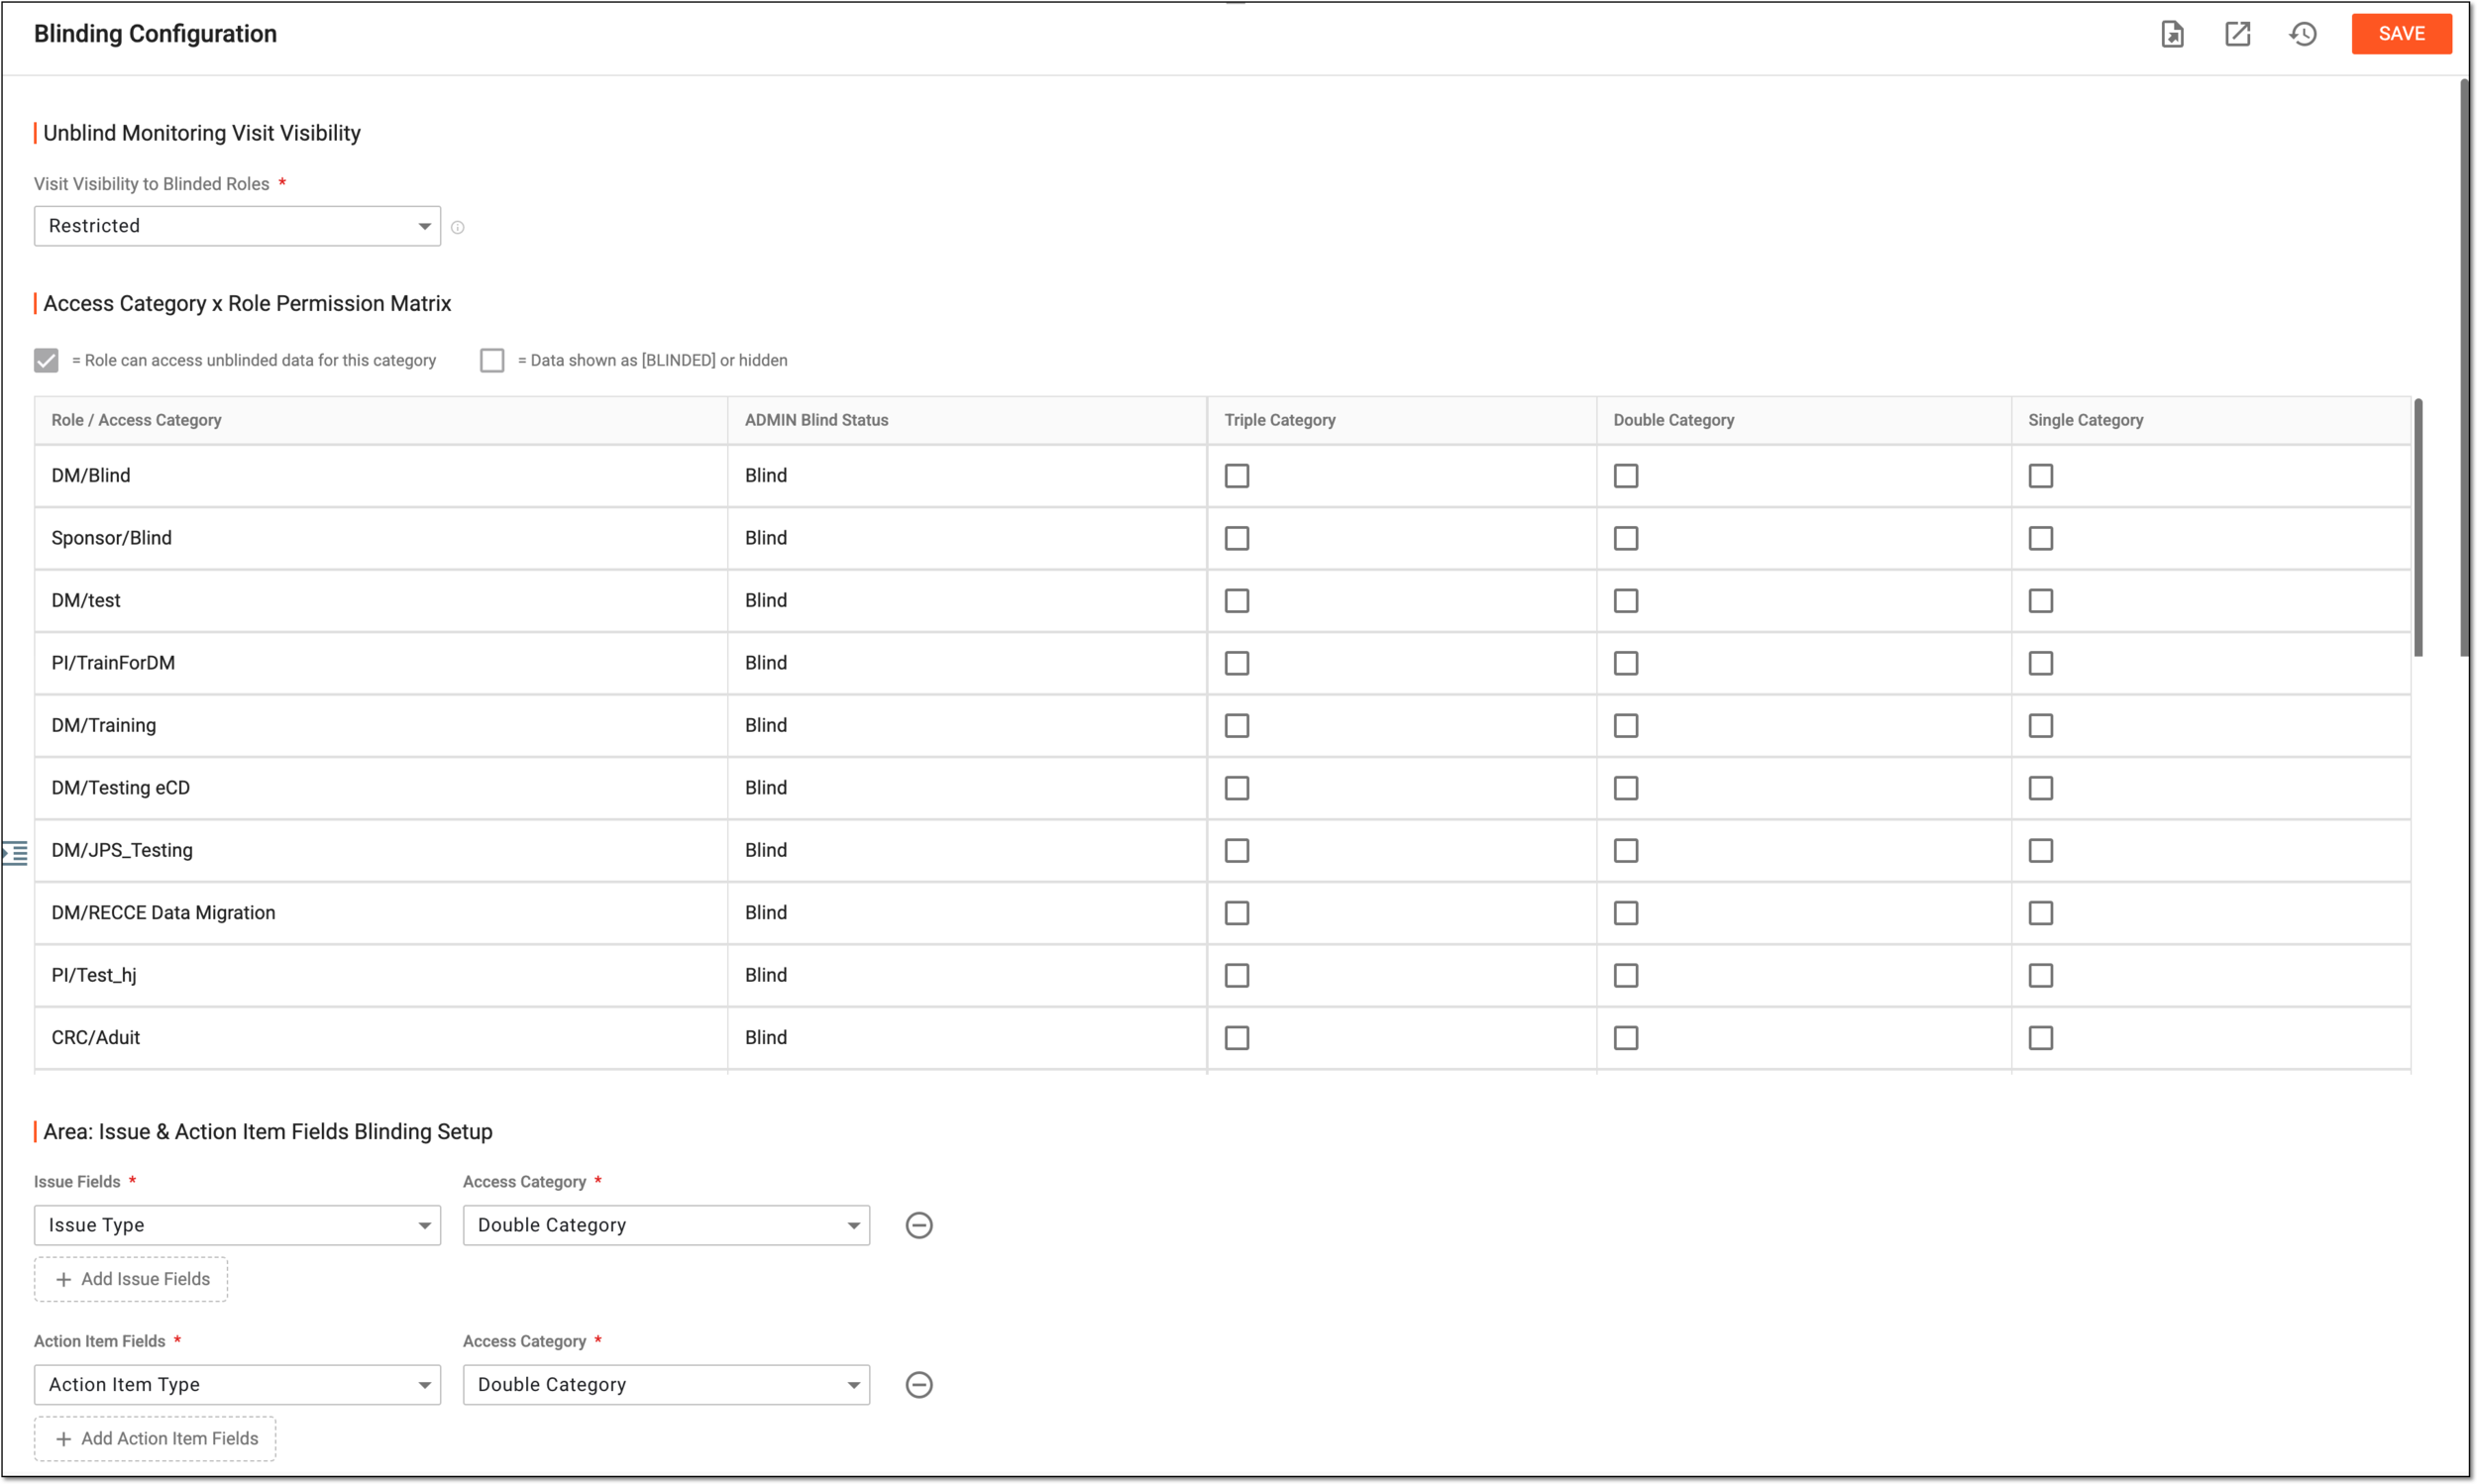
In the following sections, you can learn about the available blinding configurations of CTMS.
This block of blinding configuration settings is designed to control visibility of unblinded monitoring visits to users with blinded roles (restricted access to sensitive data).
-
Access the study management page in one of the following ways:
-
In the CTMS application header, select the DASHBOARD tab and then select the study dashboard of your interest.
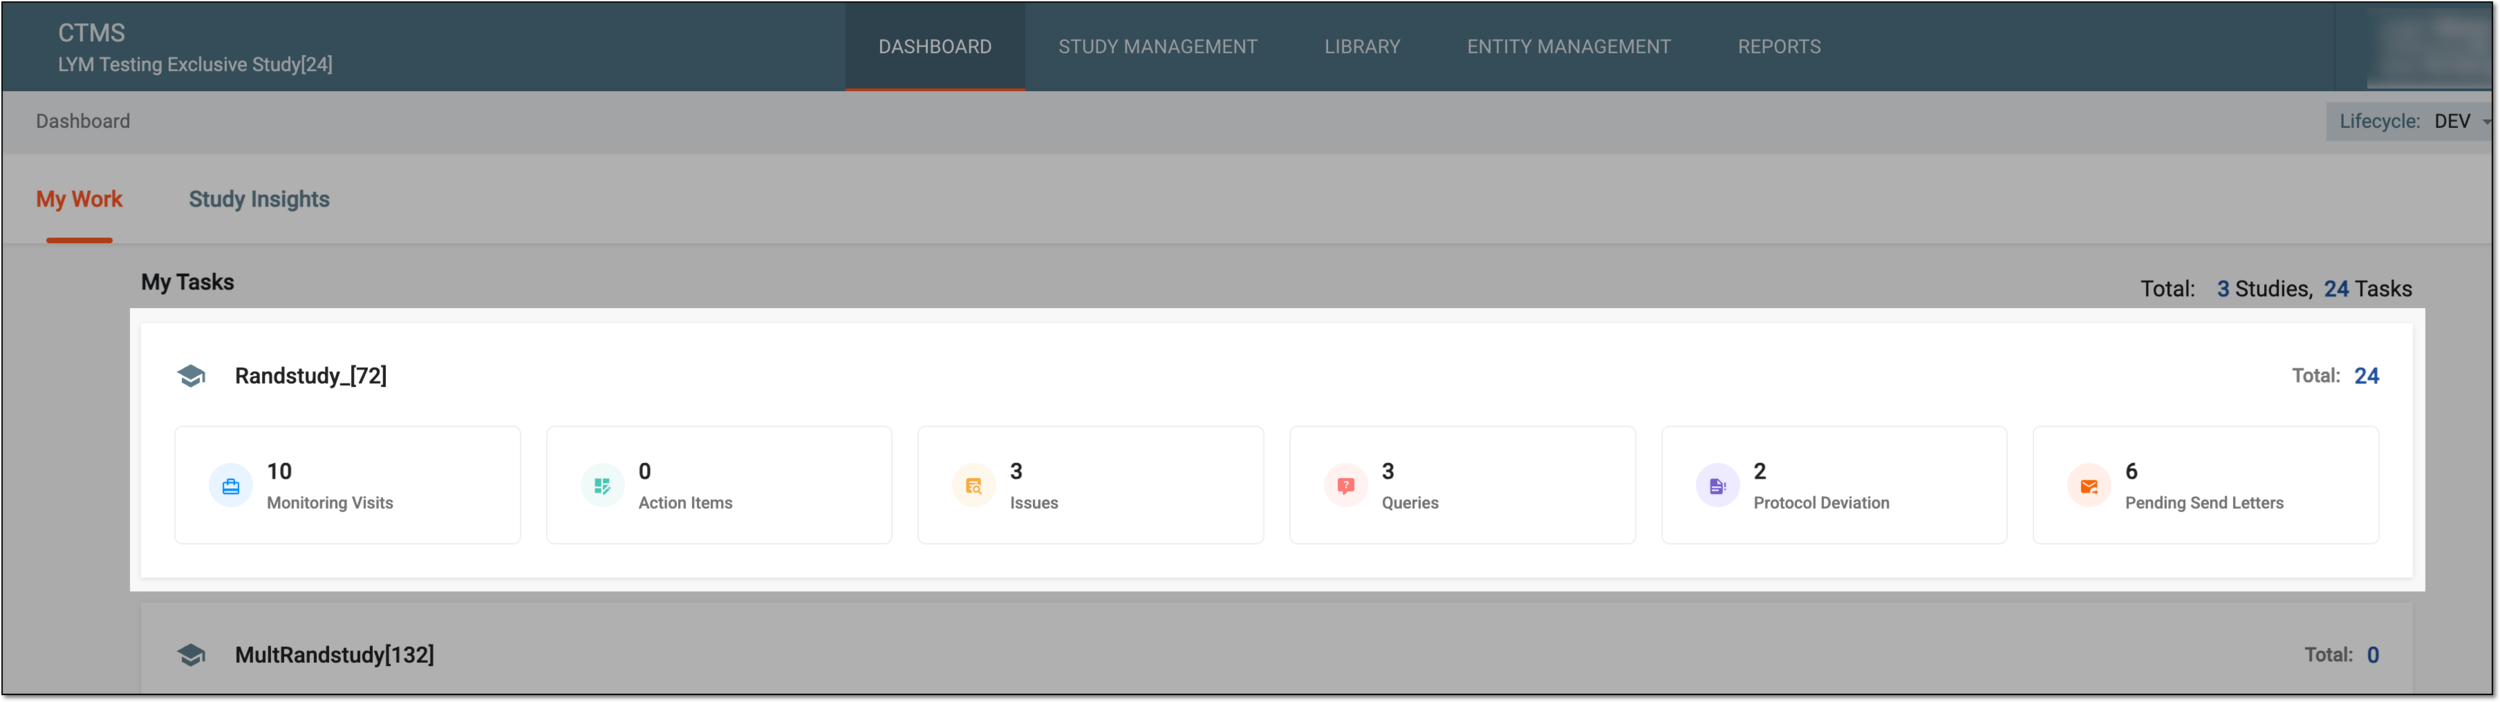 Figure 1. Accessing study management from dashboard
-
In the CTMS application header, select the STUDY MANAGEMENT tab. Then from the Study Data List table, select the study name of your interest.
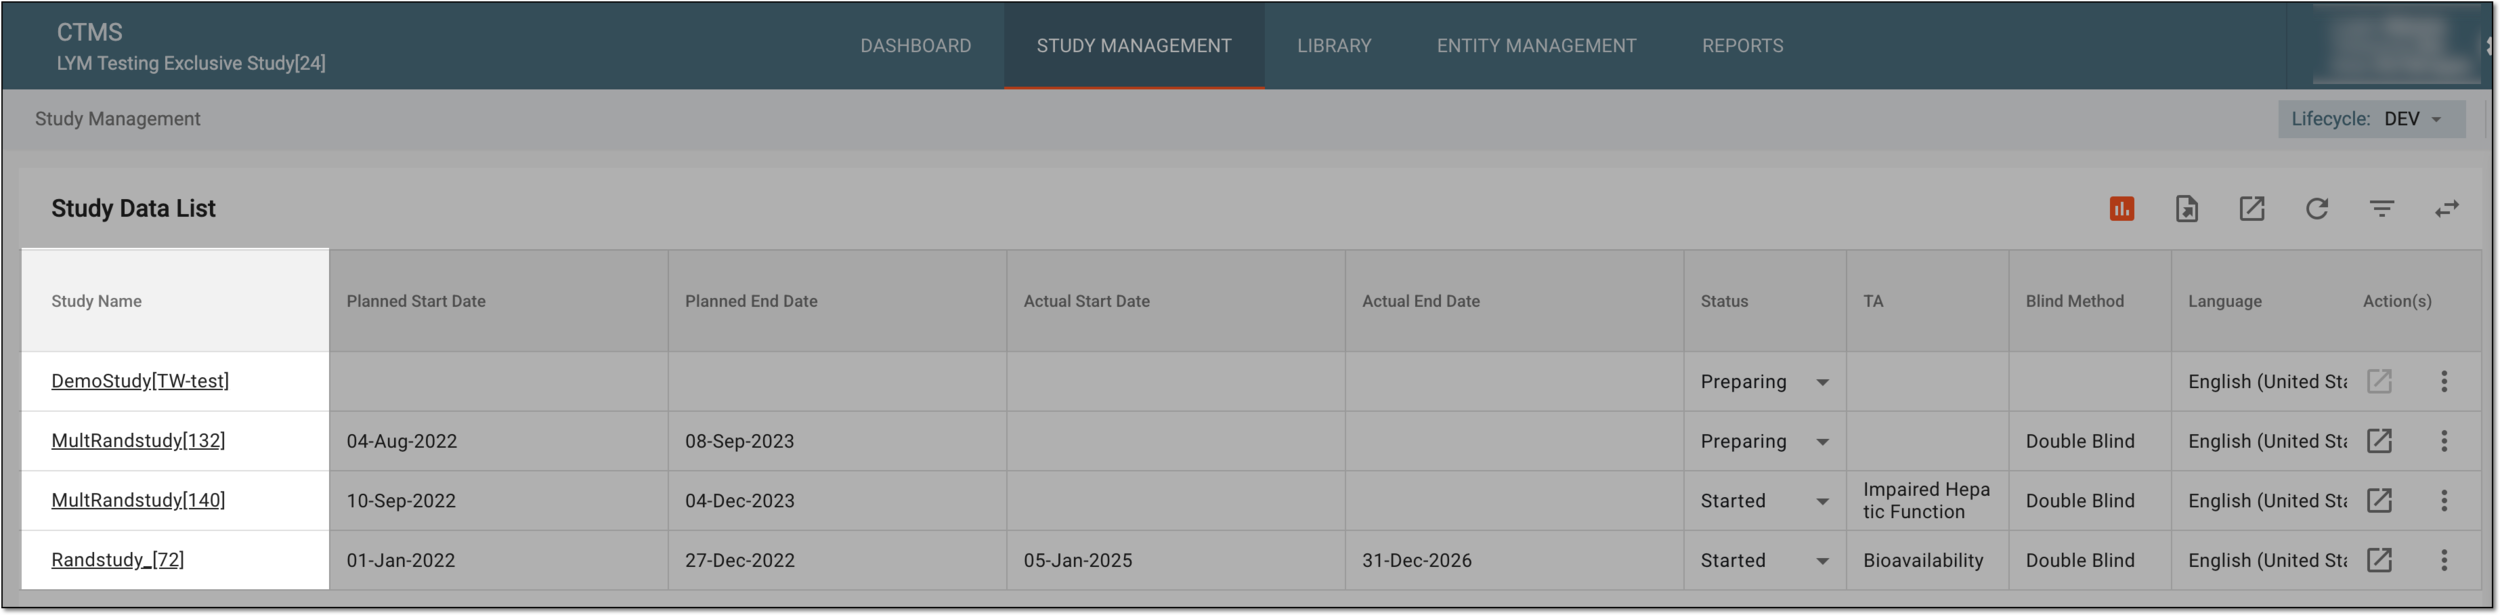 Figure 2. Accessing study management from study data list
-
-
From the left pane, select Study Details > Blinding Configuration.
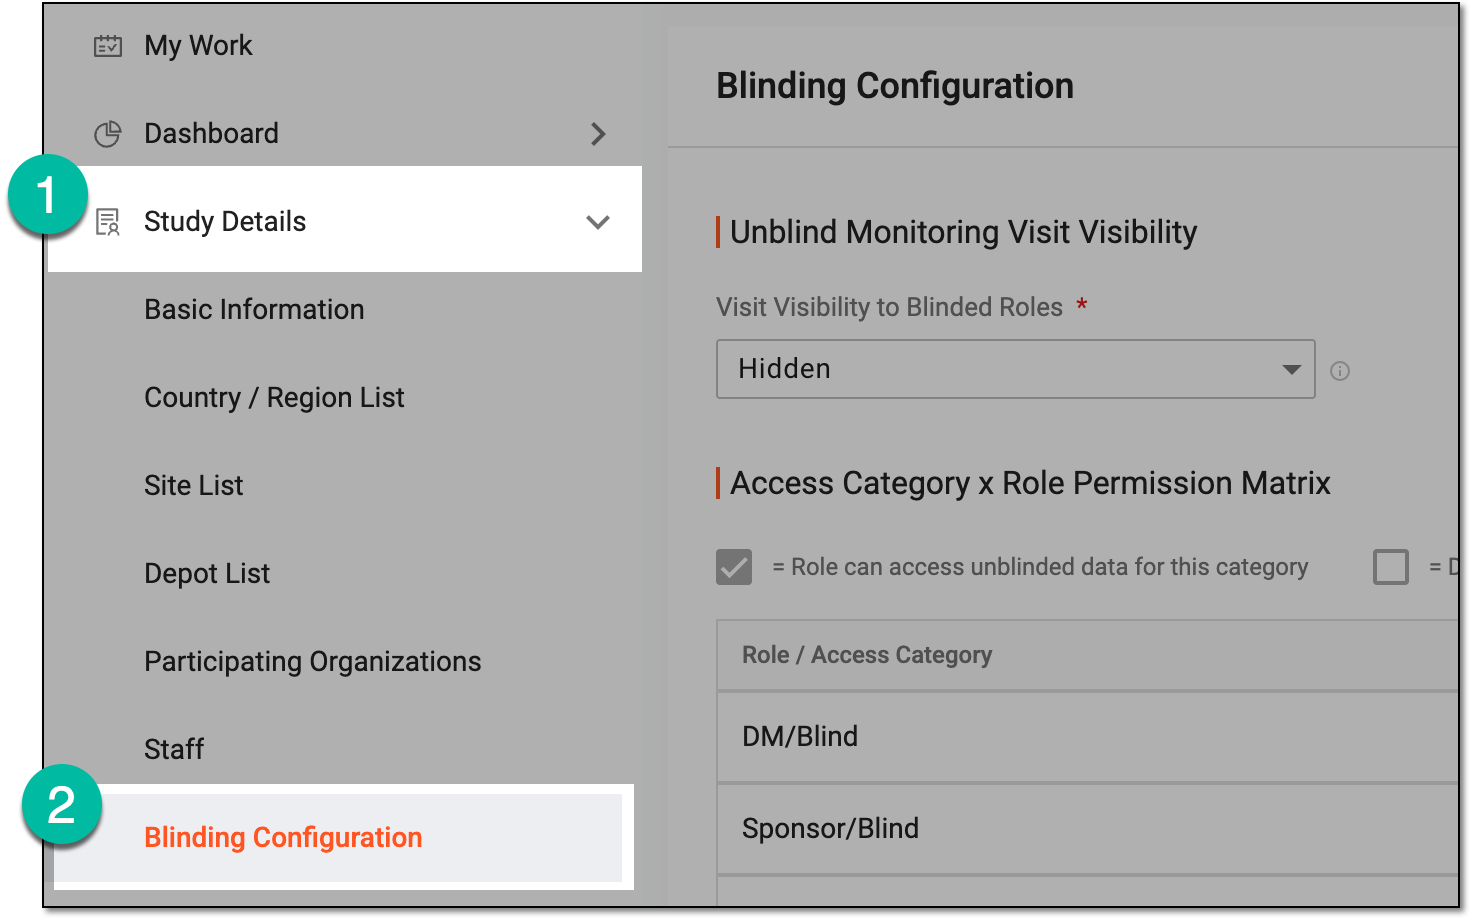 Figure 3. Accessing blinding configuration
-
On the page that opens, in the Unblind Monitoring Visit Visibility block, set up the value of the Visit Visibility to Blinded Roles field as follows:
-
Hidden: unblinded monitoring visits are completely invisible to blinded user roles on the monitoring visit list or in any other location of CTMS.
-
Restricted: unblinded monitoring visits are visible to blinded user roles, however you can control the visibility of their details, such as certain forms and fields, through managing the access categories and permissions.
 Figure 4. Configuring unblind monitoring visit visibility
-
-
Select
 to implement the changes.
Once saved, the visibility of the unblinded monitoring visit is set as configured.
This block of blinding configuration settings is designed to give permissions to certain user roles to access specific categories of sensitive data. This provides flexibility in a complex study, where there are many levels of data management, subject and treatment oversight, quality control, and so on.
-
Access the study management page in one of the following ways:
-
In the CTMS application header, select the DASHBOARD tab and then select the study dashboard of your interest.
Figure 1. Accessing study management from dashboard
-
In the CTMS application header, select the STUDY MANAGEMENT tab. Then from the Study Data List table, select the study name of your interest.
Figure 2. Accessing study management from study data list
-
-
From the left pane, select Study Details > Blinding Configuration.
Figure 3. Accessing blinding configuration
-
On the page that opens, in the Access Category x Role Permission Matrix block, control access for user roles to unblinded study data as explained in the following table.
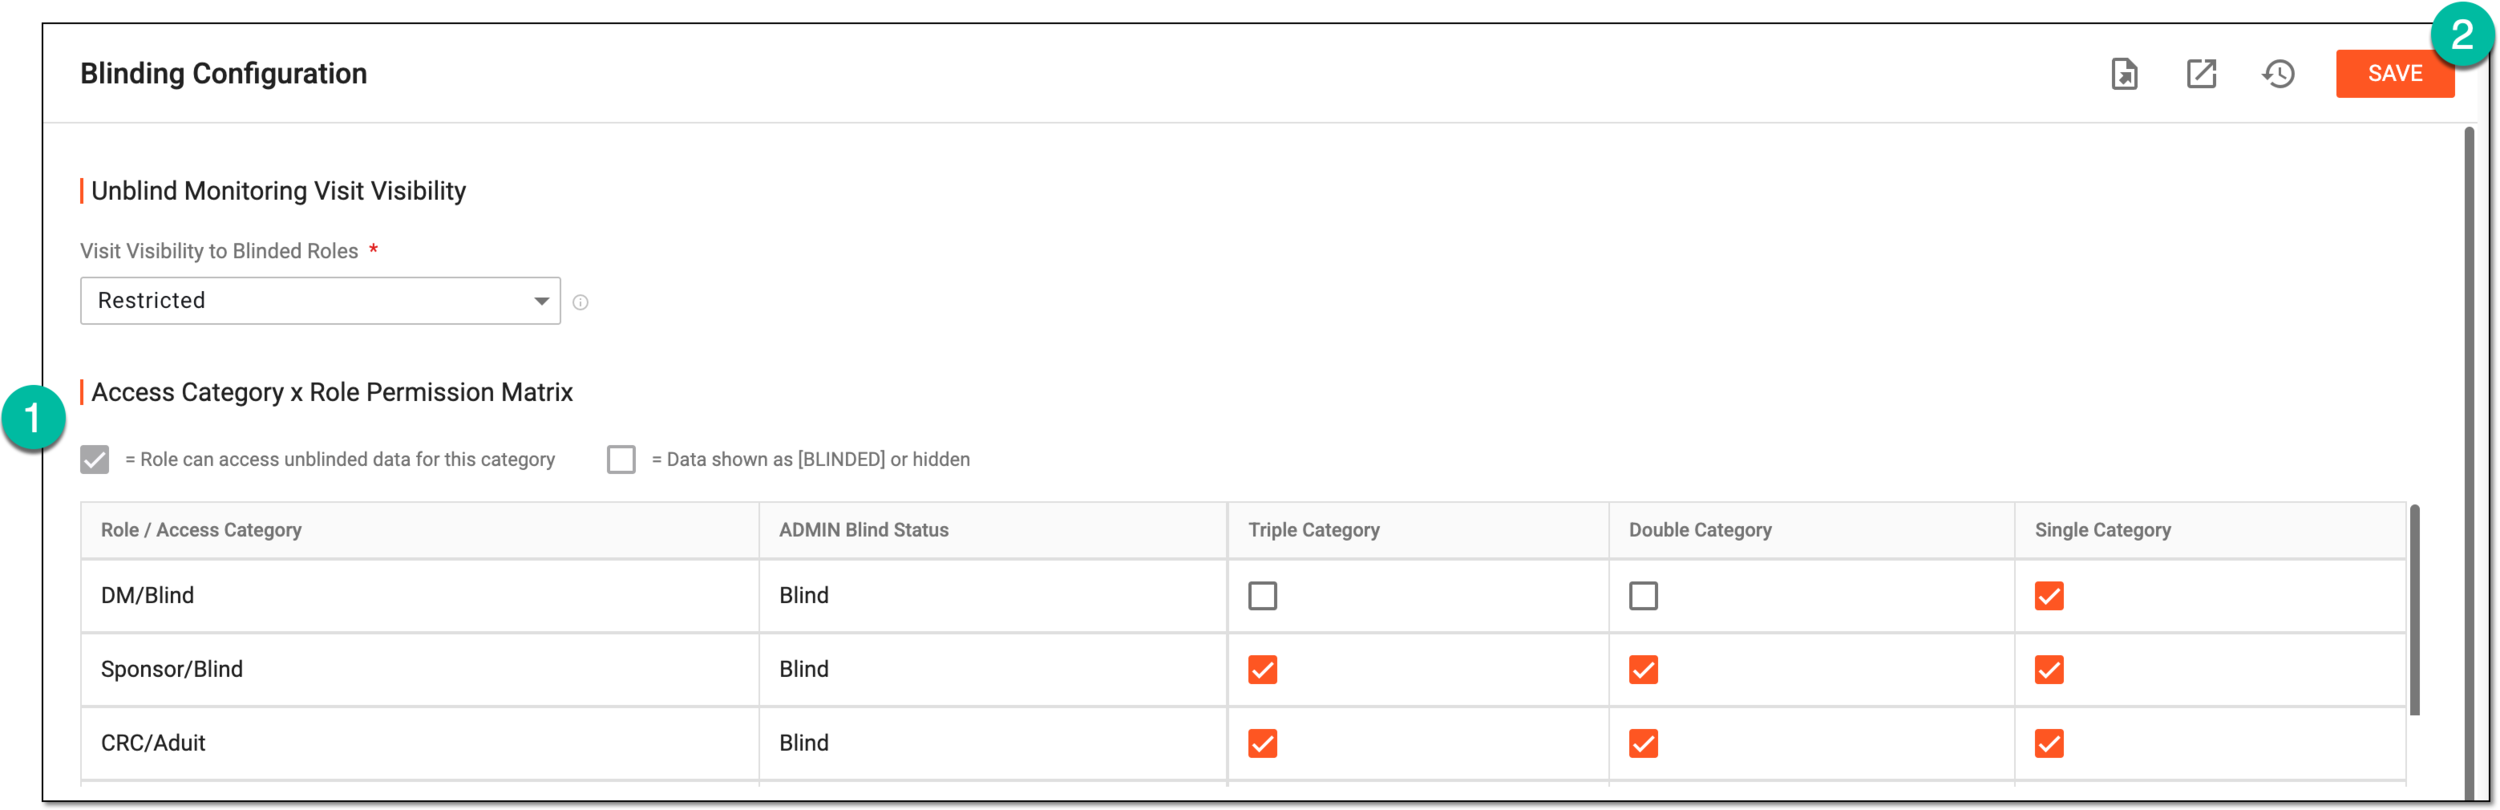 Figure 4. Configuring access categories and permission access
Element
Details
Role / Access Category
Represents the name of the user role configured via the ADMIN app.
ADMIN Blind Status
Represents the blinding status of the user role assigned to them in the ADMIN app, that is Blind, meaning that the role is not suitable to access sensitive data, thus, all the access categories are cleared for this role by default. You can select the access category to grant the permission if needed.
[Access category name]
In the column of the respective access category, manage access as follows:
-
Select the checkbox to provide the user role with permission to see the unblinded data in CTMS that is associated with this access category.
-
Clear the checkbox to shown the unblinded data in CTMS that is associated with this access category as BLINDED or hidden to the user role.
Each column represents the access category configured as the reference data element in the CTMS library. There can be as many categories as needed to
                                        support the diverse blinding mechanism of your study, and there is as many such columns here as there are access categories activated in reference
                                        data.
SAVE
Select
to implement the changes. -
Once saved, the respective user roles gain access to the unblinded data of the selected access categories and are restricted from accessing the categories that are cleared for them.
This block of blinding configuration settings is designed to manage accessibility of data items on the issue and action item forms completed during monitoring visit. To achieve this, you need to associate certain form fields to the access categories and then manage user roles that can view the data of each access category.
-
Access the study management page in one of the following ways:
-
In the CTMS application header, select the DASHBOARD tab and then select the study dashboard of your interest.
Figure 1. Accessing study management from dashboard
-
In the CTMS application header, select the STUDY MANAGEMENT tab. Then from the Study Data List table, select the study name of your interest.
Figure 2. Accessing study management from study data list
-
-
From the left pane, select Study Details > Blinding Configuration.
Figure 3. Accessing blinding configuration
-
On the page that opens, in the Area: Issue & Action Item Fields Blinding Setup block, control access to unblinded issues and actions items as explained in the following table.
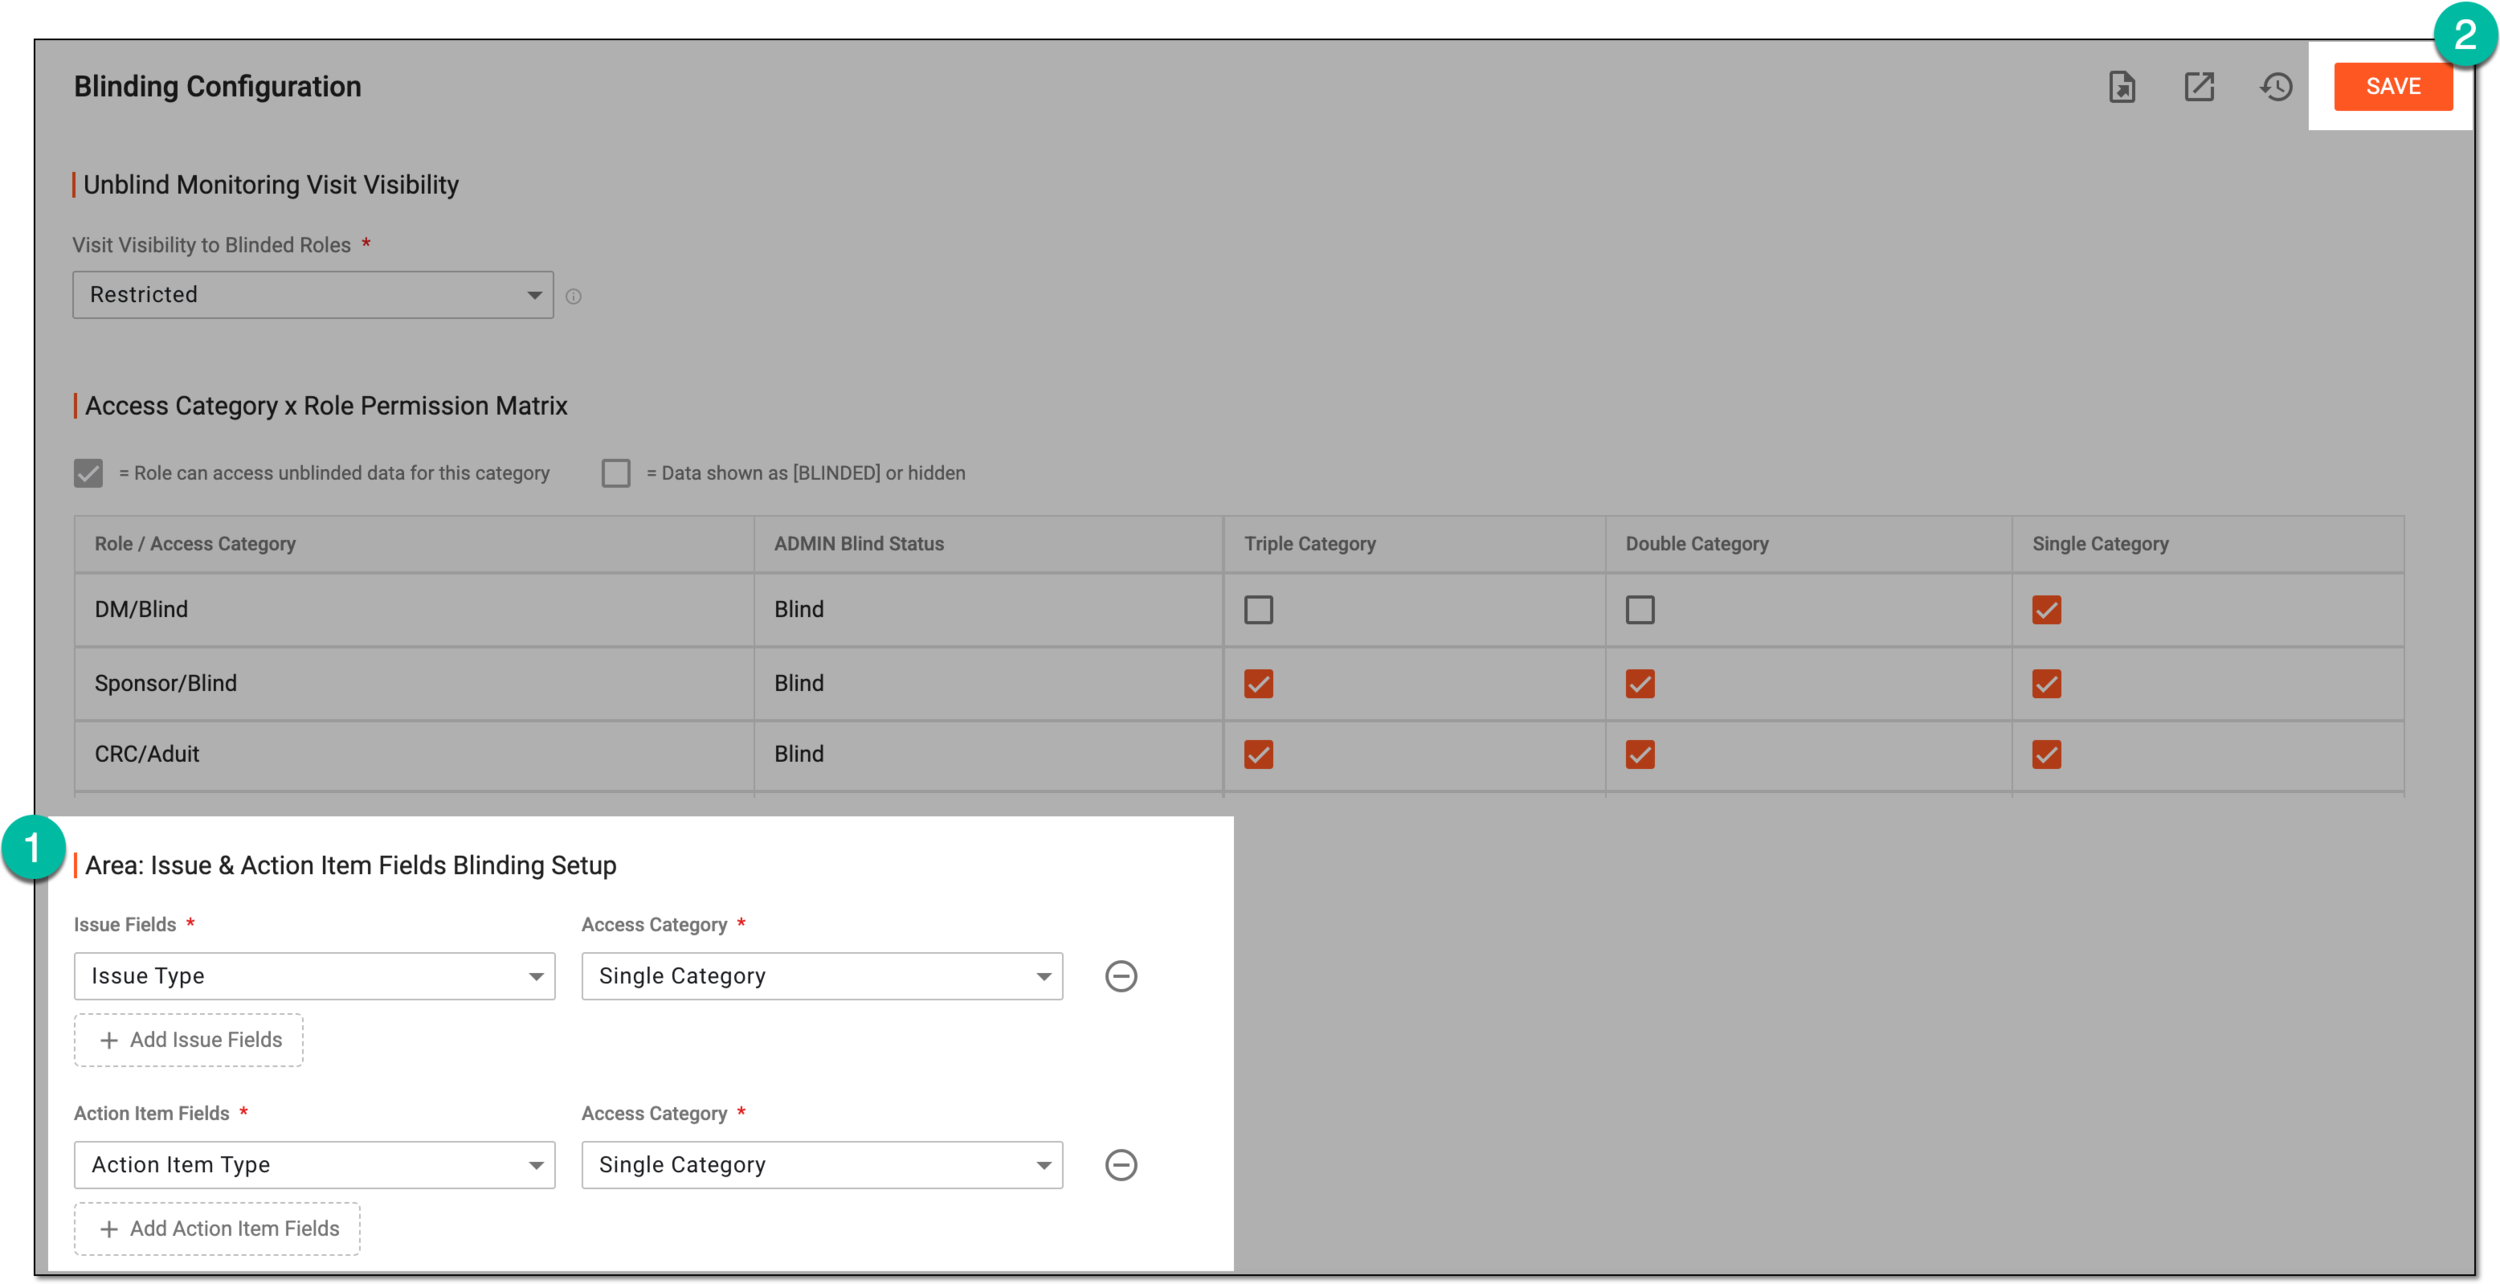 Figure 4. Configuring blinding for issue and action item fields
Element
Details
Issue Fields*
Select the field on the monitoring visit issue form that you want to associate to a certain access category.
Access Category*
Select the access category that you want to give the permission to view the data on the selected issue field.
The access categories are configured as the reference data element in the CTMS library.Add Issue Fields
Select the button to add an extra row and choose more issue fields to associate with access categories.
Action Item Fields*
Select the field on the monitoring visit action item form that you want to associate to a certain access category.
Access Category*
Select the access category that you want to give the permission to view the data on the selected action item field.
The access categories are configured as the reference data element in the CTMS library.Add Action Item Fields
Select the button to add an extra row and choose more action item fields to associate with access categories.

Select this option to remove any row you no longer need.
SAVE
Select
to implement the changes.
Once saved, the selected fields of the issue and action item forms are associated with their respective access categories.